![]() Page is locked
Page is locked
Table of Contents
King's CrossOfficial Files
Introduction
Start-Up Options
Scenarios
Eras
Other Options
Features
Electrification
ACI
Panel Notes
Cross
Finsbury
Palace
Welwyn
Hitchin
Multiplayer & Chaining
Hot Keys
Acknowledgments
Reference Section
Signal Number Plan
Signal Box Prefix Codes
Platform, Loop & Siding Lengths
Headcode Routing Letters
Speed Limits
Gradients
TIPLOC Codes
Splash Screens
Version History
King's Cross
| In memory of Bob Coulson who died in 2008, who was an LNER man aiming to model King's Cross in the steam era but sadly was never able to finish. |
Official Files
| Title | Version | Released |
|---|---|---|
| Simulation (Donationware) | 3.9 | 19/07/2021 |
| 1985 WTT (Midnight and 0600 Start included) | 1.0 | 23/01/2017 |
| King's Cross 2009-10-15 SX (midnight, and 04:45 start times) | 5.1 | 19/07/2021 |
| King's Cross 2015-04-08 SX (midnight, 4am, and 2pm start times) | 5 | 20/04/2021 |
Additional user-written timetables are available to download here .
Introduction
Kings Cross has been a long time in the making and has gone through several revisions as more information has become available; the main source being the 'box itself, so it is with thanks to the staff of King's Cross that this simulation is even more realistic. This awesome simulation is one of the largest, and perhaps, the most complex SimSig available as regulation is important.
The simulation is based on the area of control of Kings Cross Power Box. The difference is that SimSig does not control Biggleswade or Royston, but everything else from the terminus to just north of Hitchin and Baldock on the Cambridge Line, as well as the Finsbury Park to Moorgate branch and the whole "Hertford Loop" Line.
Most of the work will be done on the first 34 route miles of the East Coast Main Line. With everything else, there is a total of at least 64 route miles in this simulation. It will be very busy, especially in the rush hour, thus making the sharing of the simulation on the internet an enjoyable alternative to single player sessions.
Start-Up Options
Scenarios
Normal Running
No line closures
Slow lines closed at Knebworth
The Up and Down slow lines are closed between Langley Jn and Woolmer Green Jn.
Incident at New Southgate
Following a minor derailment of an engineering train, the Up Slow is closed between Oakleigh Park and New Southgate.
Fast lines closed at Welwyn
The Up and Down Fast lines are closed between Hatfield and the north end of Welwyn Garden City.
Platform 9 out of use at Kings Cross
Platform 9 is out of use at Kings Cross.
Gasworks Tunnel
Lines C and D (Up and Down Slow) are closed through Gasworks Tunnel; this also means that Platforms 10 and 11 cannot be accessed.
Fast lines closed at Finsbury Park
The Down Fast is closed between Holloway South and Finsbury Park; the Up Fast is closed between Finsbury Park and Holloway North.
Eras
Old Layout
The layout in use in the 2000s, which is relatively unchanged since the opening of Kings Cross PSB.
Modern Layout
The Modern Layout reflects changes made between 2009 and 2013:
- Platform 0 was constructed at Kings Cross; this also resulted alterations to the Loco Sidings.
- The Up Goods has been converted to the Up Slow 2; as part of these works, platforms were provided on this line at Alexandra Palace and Finsbury Park. The line was also extended back to connect directly with the Up Hertford.
- Gordon Hill Platform 4 closed.
- The Hitchen Flyover was opened, allowing moves from the Down Fast and Slow to the Cambridge route without conflicting with movements on the Up lines.
Other Options
Difficulty Level
Easy mode: No train delays or equipment failures.
Normal mode: Minor delays to trains and small chance of equipment failures.
Hard mode: More severe delays to trains and larger chance of equipment failures.
Bad weather: Bad weather means that there are major delays on all routes, and a high chance of equipment failures. Additionally, reduced adhesion means that trains are accelerating slower and braking earlier.
Features
Electrification
All running lines have 25kV ac overhead electrification, with the following exceptions:
- Drayton Park (exclusive)- Moorgate
- Harringay Curve
The following yards and sidings are electrified:
- Ferme Park CS
- Hornsey EMU Depot
- Bounds Green depot
- Welwyn Garden City CS
- Hertford North
- Letchworth CS
750V DC Third Rail
The lines between Drayton Park (inclusive) and Moorgate are electrified with 750V DC third rail.
ACI
Automatic Code Insertation is provided at Kings Cross, Moorgate, Finsbury Park, Gordon Hill, Hertford North, Welwyn Garden City, Stevenage, Hitchen and Letchworth. This has been added as an aid to solo players; the real box does not feature it.
Panel Notes
Panel boundaries have been ammended slightly from those of the real box, in order to even out workloads in Multiplayer.
Cross
Platforming
TRTS is provided on all platforms.
Via buttons are provided in King's Cross station throat.
There are eleven platforms at Kings Cross in the Old era and twelve in the New era. It is important to know about their restrictions regarding length. All platforms are Permissive
Platforms 0 and 1 to 8 are the longest. These are the platforms that are covered by the old train shed. These platforms will hold the GNER trains, HSTs and up to 12 carriages (just) of Electric Multiple Units (EMU). Eurostars, however will only fit into Platforms 1 and 6. Note that trains for Platform 1 must be on the Fast lines beyond Holloway South.
Platform 0: Max length to fit in signal 255 Track Circuit with no restrictions [303 meters], and override signal 255 blocking platform 1 [333 meters].
Platforms 9, 10 and 11 are offset to the side and can only hold 8 carriages of EMU. No GNER trains will fit.
The loco sidings are the short sidings adjacent to Platforms 0/1.
Depending on the timetable, you may see 1X-- trains which are North of London Eurostars forming the White Rose services to York or Leeds (again, depending on the timetable). These trains will only fit into platforms 1 and 6 at King's Cross. Accessing platform one must be via signal 287 (not via "A"!).
Double Docking (Platform Sharing)
It is quite common for double docking to occur at Kings Cross. This is shown by a platform being something like “8F”. Ensure that the second unit will not delay the departure of the unit at the buffer end of the platform and ensure that the trains will fit in the platform. Overlength train indicators are provided to help with this. These indicators use length measuring equipment to approximate the length of trains approaching King's Cross. If a train is signalled to an occupied platform, the signalling will detect if the length is too long to fit and light the indicator, and the subsidiary signal will not clear. This is not to be relied upon, as per real life.
Camden Road
A slot must be requested for trains towards Camden Road, and the Camden Road signaller will request a slot to send trains towards Belle Isle. Note that the overlap of signal 33 extends on to the Down Slow.
Finsbury
Moorgate
These platforms will hold 6 car dual voltage EMUs. These are the only trains allowed on the Moorgate Branch.
Both platforms are permissive.
TRTS is provided on all platforms. If automatic working is enabled (see below), this will also trigger route setting.
Automatic working is available at Moorgate and can be toggled via the AUTO button next to the buffer stops. It operates on a first-come, first-served basis and will preferentially use platform 9, unless that platform is occupied or a route has been set from it.
Routes for incoming trains will be set once these have left Old Street and are approaching signal 342.
Slots
Slots must be requested to send trains over the single lines to Harringay Park Jn and Dalston.
Hornsey EMU Depot
Trains Departing for the North: Trains will enter at the south end of Hornsey EMU depot. They will then reverse either in the Harringay Reversing Siding, the Up Goods Line (Old era) or the Up Slow 2 (New era). These trains need to be routed via the flyover line to join the Down Slow or Down Slow 2 Lines. The Up Slow (1) can be used to reverse trains, however this will likely cause delay to passenger trains on that line.
Trains Arriving from Kings Cross, Moorgate or Dalston Kingsland: Trains reverse in the Hornsey Reversing Sidings or on the Down Slow 2 Line, then via the flyover to the Harringay Reversing Siding or Up Goods to reverse before being routed into the southern end of Hornsey Depot.
Reversing Eurostar Trains
Eurostar trains must reverse on the Down Slow 2 Line adjacent to Hornsey Station and then be routed via the flyover.
Palace
Bounds Green
Trains Arriving from King's Cross: These are routed into the Bowes Park Reversing Siding on the Hertford Loop Line and then into Bounds Green Depot. Note that there is no TD berth in Bowes Park sidings.
Trains Arriving from the North: These should be routed via the Hertford Loop to access the depot.
Gordon Hill
There are two bay platforms shown here, but only the one on the up side is in operation in the New era. Keep an eye open for any trains with a “G” in the headcode, as these may need to reverse at Gordon Hill.
TRTS is provided for platforms 1 and (in the old era) platform 4 only.
Regulation Notes
- Trains booked non-stop via Welwyn Garden City will accept the route via Hertford North.
- Note that trains are often booked to switch between the Fast and Slow between Alexandra Palace and Potters Bar; take care to keep trains on the correct lines.
Welwyn
Welwyn Garden City
Passenger trains may start from Platforms 3 or 4 via the flyover towards the Up Slow Line.
Trains from the Carriage Sidings to Platform 1 at Welywn Garden City are routed via the flyover and the Reversing Siding.
Beware - TRTS is not provided at Welwyn.
Digswell to Woolmer Green
This is a short two-track section. The restricted layout is due to a viaduct and two tunnels and can cause a bottleneck, especially when trains are late. Woolmer Green Junction is a high-speed junction. Both ends of this section are signals with flashing yellow signals to assist in clearing this two-track section as quick as possible.
Hertford North
There is a siding on the Down side which will hold a short EMU, which is only accessible from platform 3. The layout at Hertford North is quite straightforward. Trains can access the sidings on the up side from all platforms.
Only platform 3 is permissive from signal 909. All platforms are permissive from shunt signals.
Beware- TRTS is not provided at Hertford.
Hitchin
Stevenage and Langley Junction
The Hertford Loop joins at Langley Junction via another grade-separated junction. Many trains from the Hertford Loop will terminate at Stevenage and then reverse to go back towards the Hertford Loop. Beware! You need to keep an eye out for these (normally with an “F” in the description) and ensure that no trains are routed behind it, so as to trap it in platform 4.
Platform 4 at Stevenage is permissive.
Hitchin
Hitchin is where a flat junction is and where the Cambridge Lines start. The platforms are only on the Slow Lines, so watch out for those trains that are booked to stop.
In the New era there is a new flyover to the north (left) of the station. This allows Down trains to access the Cambridge line without affecting the Down Fast or the Up lines.
Letchworth
There is a carriage siding complex at Letchworth. The bottom siding is a reversing siding, and only trains booked via the reversing siding should be routed into this siding.
The carriage sidings have access at the south (Letchworth) end and the North (Baldock) end. Sometimes, trains will appear at the North end to be crossed over at Baldock. Be careful to ensure that they do reverse and be careful about letting these out too early.
Regulation Notes
- Take care to send trains over the two-track section to Welwyn in the correct order; fast trains may have recovery time included to allow them to follow a stopping service.
- Trains booked non-stop via Welwyn will accept the route onto the Hertford line at Langley Jn.
Watton GF
In SimSig, the player takes on both the role of signaller and ground frame operator in these instructions
Trains will usually arrive/depart Watton GF in the Stevenage direction.
Train In: To get a train into Watton Oil Terminal, the signaller must first release the ground frame, by clicking the green 'F' roundel. The ground frame operator should then reverse lever 1 to take the release and unlock the frame. Reversing lever 2 unlocks the facing point lock for the points into the siding, and lever 3 moves the points once they've been unlocked. The ground frame operator should then normalise lever 2 to lock the points in the reverse position. Lever 5 can then be reversed to clear the shunt aspect on K930 and permit the movement into the siding. Once the movement is complete, the ground frame operator should retrace the above steps in reverse to restore the ground frame to it's previous condition and allow trains to run on the mainline. Once all the levers are restored to normal, the signaller can right-click on the 'F' roundel, which will be flashing white. The signaller can then clear their signals for mainline running.
Train Out: To get a train out of Watton Oil Terminal, the process is essentially the same as above. The Signaller releases the frame as above, and the GF operator takes the release. After reversing the siding points and crossover points, instead of reversing lever 5, to click the "Siding Handsignal" to authorise a train out of the sidings. Note this is NOT interlocked with the ground frame, and thus care should be taken to ensure points are set correctly for the move before giving the handsignal.
Multiplayer & Chaining
These may not match the panel exactly but give a fairly even distribution of workload for each operator. The boundaries, where possible, have been designed so that setting a route across a workstation boundary does not affect the next operator. Where a green line passes through a signal, this means that that is where one operator's exit signal lies and the next operator's entrance signal lies. For example, the Cross workstation would set route 313 to 317, but the Finsbury operator would set 317 to either 321 or 323. Telephone calls from that signal would go to Finsbury in this case.
The simulation chains at the following locations:
| Simulation | Location |
|---|---|
| Cambridge | Royston |
| Peterborough | Biggleswade |
| Royston | Royston |
Note that the simulation can be chained to either Royston or Cambridge; it cannot be chained to both at the same time.
King's Cross cannot currently be chained to North London Line at Camden Road, Dalston and Holloway, due to the age of the NLL simulation.
Hot Keys
In addition to the standard shortcut keys , the following are available:
| Key | Panel Area |
|---|---|
| 1 | Panel 1 (Cross) |
| 2 | Panel 2 (Finsbury) |
| 3 | Panel 3 (Palace) |
| 4 | Panel 4 (Welwyn) |
| 5 | Panel 5 (Hitchin) |
| Shift+A | Alexandra Palace |
| Shift+H | Hitchin |
| Shift+K | King's Cross |
| Shift+N | Hertford North |
| Shift+P | Potters Bar |
| Shift+S | Stevenage |
| Shift+W | Welwyn Garden City |
Acknowledgments
Simulation by: Geoff Mayo
1985 WTT by: Kurt Sicklemore
Geoff Mayo, Mike Miles, and Clive Feather have all contributed significantly to this simulation. Countless others have offered advice and information which we appreciate greatly.
Reference Section
Signal Number Plan
These are Adobe Acrobat PDF files. If you don't have Adobe Acrobat Reader installed on your computer you can get a free download of the latest version from the Adobe website .
Signal Box Prefix Codes
| Code | Box |
|---|---|
| DJ | Dalston Junction* |
| HP | Harringay Park Junction* |
| CR | Camden Road* |
*Fringe box, signals not controlled by this sim.
Non-prefixed signals are controlled by King's Cross (Plated K on the ground)
Platform, Loop & Siding Lengths
Platform Lengths- Kings Cross
| Platform | Length (m) |
|---|---|
| 0 | 305# |
| 1 | 298# - 360@ |
| 1 | 298# - 295@ |
| 2 | 294# - 294@ | 3 | 294# - 294@ |
| 4 | 292# - 300@ |
| 5 | 278# - 285@ |
| 6 | 287# - 312@ |
| 7 | 287# - 298@ |
| 8 | 279# - 279@ |
| 9 | 167# - 170@ |
| 10 | 170# - 174@ |
| 11 | 170# - 174@ |
Notes: Lengths with "#", indicate Buffer stop to top of ramp. Lengths with "@", indicate Buffer stop to Signal.
These platform lengths are shown in the chart below.
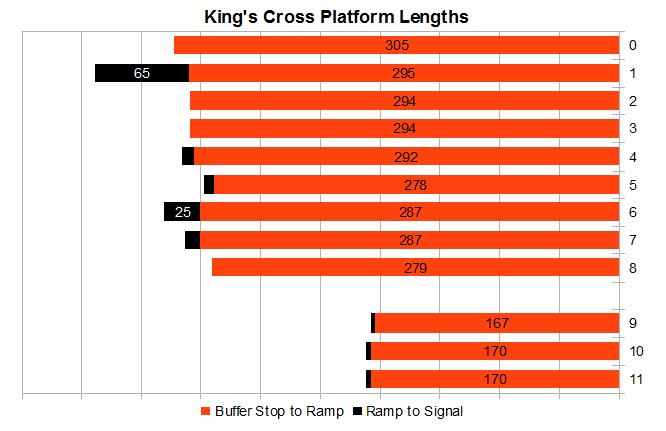
Red indicates the length between the buffer stop and the top of the ramp (K285 for platform 1) and Black the length between the top of the ramp and the platform starter signal (between K285 and K287 for platform 1).
Platform lengths are given in metres, with the gridlines at 41m intervals. This is estimated to be close to two typical EMU car-lengths (classes 313, 317, 321, 365).
Platform lengths are consistent with those in the 2014 Timetable Planning Rules document.
Platform Lengths
| Location | Platform | Length (m) |
|---|---|---|
| Alexandra Palace | 1 | 169 |
| ::: | 2 | 169 |
| ::: | 3 | 169 |
| ::: | 4 | 170 |
| Arlesey | 1 | 245 |
| ::: | 2 | 245 |
| Ashwell & Morden | 1 | 167 |
| ::: | 2 | 168 |
| Baldock | 1 | 168 |
| ::: | 2 | 168 |
| Bayford | 1 | 122 |
| ::: | 2 | 123 |
| Bowes Park | 1 | 138 |
| ::: | 2 | 138 |
| Brookmans Park | 1 | 123 |
| ::: | 2 | 123 |
| ::: | 3 | 123 |
| ::: | 4 | 123 |
| Crews Hill | 1 | 126 |
| ::: | 2 | 126 |
| Cuffley | 1 | 126 |
| ::: | 2 | 126 |
| Drayton Park | 1 | 124 |
| ::: | 2 | 124 |
| Enfield Chase | 1 | 125 |
| ::: | 2 | 126 |
| Essex Road | 1 | 128 |
| ::: | 2 | 128 |
| Finsbury Park | 1 | 245 |
| ::: | 2 | 247 |
| ::: | 3 | 263 |
| ::: | 4 | 249 |
| ::: | 5 | 239 |
| ::: | 6 | 178 |
| ::: | 7 | 246.5 |
| ::: | 8 | 168 |
| Gordon Hill | 1 | 122 |
| ::: | 2 | 122 |
| ::: | 3 | 122 |
| ::: | 4 | 122 |
| Grange Park | 1 | 129 |
| ::: | 2 | 129 |
| Hadley Wood | 1 | 186 |
| ::: | 2 | 126 |
| ::: | 3 | 126 |
| ::: | 4 | 186 |
| Harringay | 1 | 126 |
| ::: | 2 | 125 |
| Hatfield | 1 | 170 |
| ::: | 2 | 170 |
| ::: | 3 | 170 |
| Hertford North | 1 | 154 |
| ::: | 2 | 153 |
| ::: | 3 | 145 |
| Highbury & Islington | 4 | 128 |
| ::: | 6 | 126 |
| Hitchin | 1 | 247 |
| ::: | 2 | 249 |
| Hornsey | 1 | 126 |
| ::: | 2 | 124 |
| Knebworth | 1 | 169 |
| ::: | 2 | 169 |
| ::: | 3 | 169 |
| ::: | 4 | 169 |
| Letchworth Garden City | 1 | 184 |
| ::: | 2 | 184 |
| Moorgate | 9 | 123 |
| ::: | 10 | 126 |
| New Barnet | 1 | 165 |
| ::: | 2 | 165 |
| ::: | 3 | 177 |
| ::: | 4 | 160 |
| New Southgate | 1 | 172 |
| ::: | 2 | 172 |
| ::: | 3 | 172 |
| ::: | 4 | 172 |
| Oakleigh Park | 1 | 174 |
| ::: | 2 | 174 |
| ::: | 3 | 173 |
| ::: | 4 | 173 |
| Old Street | 3 | 128 |
| ::: | 4 | 128 |
| Palmers Green | 1 | 137 |
| ::: | 2 | 127 |
| Potters Bar | 1 | 164 |
| ::: | 2 | 164 |
| ::: | 3 | 166 |
| ::: | 4 | 166 |
| Stevenage | 1 | 247 |
| ::: | 2 | 247 |
| ::: | 3 | 247 |
| ::: | 4 | 247 |
| Watton-at-Stone | 1 | 126 |
| ::: | 2 | 126 |
| Welham Green | 1 | 129 |
| ::: | 2 | 129 |
| Welwyn Garden City | 1 | 185 |
| ::: | 2 | 185 |
| ::: | 3 | 185 |
| ::: | 4 | 185 |
| Welwyn North | 1 | 170 |
| ::: | 2 | 170 |
| Winchmore Hill | 1 | 135 |
| ::: | 2 | 136 |
Siding Lengths
| Location | Siding Name | Length (m) |
|---|---|---|
| Bowes Park | REV | 299 |
| ::: | SPUR | 39 |
| Harringay (Reversing) | US | 719 |
| ::: | UG | 339 |
| ::: | REV SDG | 339 |
| Hornsey (Reversing) | REV 1 | 219 |
| ::: | REV 2 | 219 |
| ::: | DS2 | 369 |
Headcode Routing Letters
The second character of the train description is a guide to the trains routing/destination. Below is a general guide to what the letters mean in the Kings Cross area. Note these are the most commonly used codes, and may not apply to all timetables as variations have existed over the years. Refer to individual timetable documentation for more specfic and relevant details.
| Letter | Route | |
|---|---|---|
| A | Express services to Kings Cross | |
| B | Local services to Hertford North | |
| C | Services to Cambridge | |
| D | Local services from Letchworth/Stevenage/Hertford North to Kings Cross, Express services to Leeds | |
| E | Services from other regions to Eastern Region, some ECS to Hornsey | |
| F | Local services to Stevenage via Hertford Loop | |
| G | Local services to Gordon Hill | |
| H | Express services to Hull | |
| I | Not used | |
| J | Local services from Letchworth/Stevenage/Hertford North/Gordon Hill - Moorgate | |
| K | Local services from Welwyn Garden City - Moorgate | |
| L | Services for Anglia Region | |
| M | Services for Midland Region | |
| N | Express services to Newcastle/Sunderland/York | |
| O | Services for Southern Region | |
| P | Services to Peterborough | |
| Q | Not used | |
| R | Services Royston/Letchworth via Welwyn (ECML) | |
| S | Services for Scotland Region | |
| T | Kings Cross - Kings Lynn/Ely | |
| U | Not used | |
| V | Local services to Welwyn Garden City | |
| W | Not Used | |
| X | Out of Gauge Trains | |
| Y | Local services from Welwyn Garden City to Kings Cross, some ECS from Kings Cross to Ferme Park and Bounds Green | |
| Z | Charter / Other special trains |
Speed Limits
It is beyond the scope of this document to list all the speeds on the Kings Cross area. The fast lines are generally 100mph to 115mph between New Southgate and Woolmer Green, and then 125mph north of Woolmer Green. The slow lines are generally 75mph nearer to Kings Cross, but as fast as 90 mph north of Hitchin. Crossovers are normally anything from 20 to 40mph, but there are some faster ones too.
Gradients
Gradients are described starting from London. The descriptions here are deliberately vague to keep the descriptions simple; the simulation itself has more accurate gradients.
Main Line
King's Cross itself is on the level, but the track immediately drops to 1 in 79 to duck below the Grand Union Canal, whereupon it rises again at a more sedate 1 in 114 to 1 in 102 towards Holloway. There are then various up and down gradients as far as Alexandra Palace where the track starts rising at 1 in 200 all the way to Potters Bar. Gentler declines with an occasional gentle rise take us down to Hatfield, where the gradient shortly thereafter rises again to Digswell Junction. Some steeper gradients of 1 in 163 and 1 in 193 take us through the Welwyn tunnels where it levels off until Knebworth. From there the gradient declines to Langley Junction at 1 in 220. It then levels off, or near enough, until north of Stevenage where another 1 in 200 takes us downhill into Hitchin, continuing downhill at a more gentle pace towards Arlesey. A short 1 in 264 takes us up beyond Arlesey before the same gradient takes us down towards Biggleswade and to the edge of the simulation.
Hertford Loop
A bit of a rollercoaster, but nothing major. A short 1 in 55 takes us from Alexandra Palace up and over the main lines (the Up line drops down to Alexandra Palace at a gentler rate) before rolling downhill towards Palmers Green where the gradients generally rise towards an apex at Winchmore Hill. A short drop thereafter and then the gradients rise again, averaging around 1 in 200 towards another apex near Crews Hill. Gradients are then near-level until popping out of Ponsbourne Tunnel where it drops down to Hertford North at mostly 1 in 198. Gradients then rise nearly all the way to Langley Junction.
Cambridge Lines
A 1 in 161 gradient takes us close to Letchworth where the gradient reverses to a 1 in 244 downhill to Baldock where it nearly levels off. A mile and a half of 1 in 197 takes us up before the gradients become near-level to Ashwell & Morden and the edge of the simulation.
Moorgate Lines
Half a mile of 1 in 150 take us uphill towards Old Street where the gradient eases. Approaching Essex Road things get a bit more interesting with gradients of as steep as 1 in 50 uphill take us out of the tunnels and into the daylight of Drayton Park. Another short uphill gradient takes us up into Finsbury Park.
TIPLOC Codes
Splash Screens
| Splash 1 | Platform 5 at King's Cross, looking towards Gasworks Tunnel. | |
| Splash 2 | A set of Class 91s (used on Inter-city services on the East Coast Main Line from 1989) wait at Kings Cross | |
| Splash 3 | Harringay on the real panel | |
| Splash 4 | Belle Isle, Gasworks Tunnels and Kings Cross station on the real panel |
Version History
Last edited by Steamer on 20/07/2021 at 19:21