![]() Page is locked
Page is locked
Table of Contents
Royston - A Beginner's GuideA few words before we begin
Contrary to expectations
Setting Routes and Interlocking
Where is Royston?
Direction of Signalling
What do Up and Down mean?
Get a Signal Map
Starting the simulation
Set Options first
A quick look at the area
Straight-through trains
Blocks and Track Circuits (TCs)
Displaying Track Circuits
Berths, Train Describers, Train Descriptions and headcodes
Signal types
Royston - A Beginner's Guide
Last completed update Jan 31 2012
Notice: This guide is undergoing extensive revision so may be incomplete or inaccurate in places. This notice will be removed when updating is completed.
Contents
| Link to page | Topics discussed |
|---|---|
| This page | Signal maps, Options, Interlocking, Blocks & TCs, Berths & TDs, Signal types |
| Setting Routes | Setting routes, Overlap, Setting, clearing and cancelling, Long routes, Catch points |
| Train Activities 1 | Next working TT |
| Train Activities 2 | Joining Trains, Calling-on |
| Replacing signals to Danger | Approach Locking, Adverse Change of Aspect (ACOA) |
| Goods Trains | Reversing, LOS, sidings |
| Miscellaneous 1 | Level Crossings, Sticky Notes, Telephone calls, Hotkeys, Hints & Tips, Moving on. |
=
Welcome to SimSig, as close as it gets to the real world of signalling in the UK.
The Royston simulation (hereon abbreviated to "sim") happens to be a good one for beginners to SimSig, as it fits on one screen and is mostly straightforward. However, bear in mind that it was written originally not as a training sim but as a detailed representation of the Royston line as it was in the 1980s, with a few extra freight trains thrown in for good measure. As this simulation is often recommended for new players, this tutorial has been written as both a detailed instruction manual for Royston, and an introduction to UK railway signalling. So let's begin with the very basics of signalling.
A few words before we begin
SimSig is not the only signalling simulator, but it stands out as one in which the way each area simulated is actually signalled has been replicated as closely as possible; even professional signallers agree on this, many contributing their free time to this program.
As SimSig is generally considered to be the most realistic simulation on the market, you may find that many ways of doing things seem strange or restricted compared to what you have experienced elsewhere. However, there is usually a reason for things working the way they do; once you understand the reasons, everything will begin to fall into place.
The more realistic any simulator is, the steeper the learning curve usually is; after all, railway signalling is a complex technology, requiring trained professionals to operate it. On top of this, real signalling uses a combination of old and new technologies. Some sims incorporate Automatic Routesetting System (ARS) technology, if the area they simulate uses it too. Others use earlier, simpler methods to set routes. In some areas you will find your layout panel varying in appearance according to the era selected (e.g., 1980s or present day); the trains, the timetable and the methods of setting routes for them will vary accordingly. But don't feel overwhelmed; as you progress from easy sims to more difficult ones, the experience you gain will enable you to handle them. Just take it easy.
Each sim has been carefully handcrafted so that the routes trains can (and can't) take are as authentic as it's possible to get. The downside is that you may find you can't do things you would normally expect to do and may find that what works on one simulation doesn't work on another, or that certain things behave differently. It is sometimes the case that, for whatever reason, things which look like they 'should' be possible actually aren't. However, treat this as a means of learning how the system really works and practice it with pride. Explanations of local variations can be found in the relevant simulation manual . As your experience grows, you'll find that you become better at predicting what can and cannot be done.
As soon as you sense trouble ahead, pause and/or save your sim, then try to reason it out, using this Wiki and the forum, not to mention the resources on the Wiki Links page, to help you do it. Hopefully this won't happen too often to you in Royston if you follow through this guide. Remember, there is a logic behind the rules to prevent conflict. The logic may not always be obvious, but it is there, otherwise training signallers would be immensely more difficult.
Thus, the final design of any sim needs to take into account:
- The history of railroading and signalling in that area. For example, the behaviour of some signals in real life may reflect their previous, rather than current significance, and this has been faithfully replicated in SimSig.
- Official regulations applying to all parts of that area, such as those governing signal placement and trackwork.
- Any concessions made by SimSig in order to produce a workable, playable environment, such as multiplayer adaptation.
- Local exceptions to SimSig's general rules, specific to the sim being played, usually for purposes of authenticity. These should be flagged in the sim's manual.
This guide will attempt to cover every feature in the Royston sim that you will need to know about when playing it with its standard timetable. However, there are many types of signals and functions found in other sims which just do not occur in Royston. Accordingly, these will be omitted from this guide though you may find a passing reference made to them.
Last, remember that many people have devoted many hours of free time to producing these simulations for you. Please bear this in mind and do not be afraid to ask questions in the forum. If you enjoy playing SimSig regularly, a donation to help us continue would be greatly appreciated. If you find the manuals lacking in certain aspects, request a Wiki edit account- this Wiki is only as good as the community makes it. A guide to editing the Wiki can be found here .
Contrary to expectations
If you've played other railway or signalling sims before, you may have certain preconceived notions about how signalmen control their trains. Somehow they can divine from their computer screens exactly what any train in their area happens to be doing at the moment; its speed, exact position, maybe what its driver plans to have for lunch. It's the signalman's job to tell the driver when to speed up, slow down, reverse or go left at the next set of points.
Nothing could be further from the truth. In reality, the driver knows his route and everything to do at any point along it in accordance with his timetable, without needing to ask you. What he doesn't know is whether it is safe to proceed, so it falls to you to inform him of this.
Setting Routes and Interlocking
Train drivers drive according to the indications of lineside signals. In order to get a train to its destination, points (aka switches, turnouts) must be in the correct position and signals displaying a proceed indication. Naturally, the settings of points and signals must be coordinated to avoid conflict with other trains using the same or adjacent tracks. This coordination is termed interlocking and in real life both signal and points settings are automated as far as possible to ensure that one train cannot enter a track reserved for another as a result of human error.
Accordingly, in SimSig you do not directly manage points or signal light colours (termed aspects). Instead, you set a route for your train from one signal to the next by selecting each in turn, and interlocking will automatically set the points and signal aspects correctly. The total route thus consists of individual route segments which you can set or cancel (subject to certain conditions, see later). We will use the term route to mean either the whole route or one of its segments, the context making this clear.
Before the advent of computer screens, setting routes was implemented on wall panels in several ways, a common one being to insert pushbutton switches alongside entrance/exit signal lights on the track map. Pushing the entrance and exit buttons in succession lit them up and cleared that region of track for an approaching train. Once the train exited the route, it could now be released for the next train by pressing the same buttons again. This kind of panel is termed an NX (eNtrance/eXit) panel because of the entrance/exit buttons used in it.
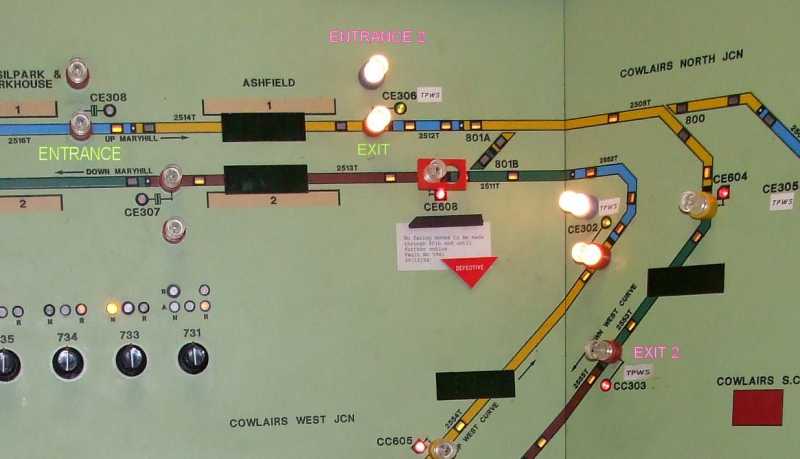
(Thanks Peter Bennet for this pic of Cowlairs North Junction showing two pairs of Entrance/Exit buttons)
Let's consider a route set from signal 1 to signal 2 (abbreviated to S1-S2). This is how SimSig displays it.

The route begins at S1, which is termed the entrance signal for this route. A train may only pass this signal if S1 allows it to proceed. Similarly, S2 marks where the train exits the route, so is termed the exit signal for this route.
The route set is displayed in white; the track before and after it, where no route has been set, is grey.
Unless special instructions are issued to the driver, a train may only move in the direction the track is signalled (arrowed) which in this example is from left to right.
You may have noticed that the route set actually extends a short distance beyond S2. This is termed overlap (abbreviated here to OL) because it overlaps the next route segment. It is a safety feature that prevents a train overshooting S2 (if the driver misjudges the braking, for example) coming into immediate conflict with another train. The overlap segment is released for use by other trains as soon as the interlocking has determined that enough time has elapsed for a train approaching S2 to stop at S2 under normal conditions.
Other points to note:
- If you wish, you can set your Options to show only red and green, as illustrated above. Indeed, this is all signallers in real life see in some types of signal box. You can, however, set the display to show the yellow and, where appropriate double-yellow aspects seen by the driver.
- The stem of S1 is white, the same colour as the route. This that the route has been set from S1. By contrast, the stems of s2 and s3 are grey, indicating that no routes have been set from them.
Let's set a further route from S2 to S3.

The route is now continuous between S1 and S3; both are showing green and their stems are lit.
The way to set a long route is to set individual routes from one signal to the next, i.e., you cannot set a route further than the next adjacent signal. However, automatic signals and automatic route setting (see later) will make this easier for you. It also follows that the shortest route that you can set is between two adjacent signals, e.g., you cannot set one from a signal to a set of points or vice versa.
Although not shown above, it is possible for one train to be proceeding along route s1-s2 while another proceeds along S2-S3. In this way signals ensure traffic separation, with only one train permitted per route segment (aka block) at a time. The distance between signals determines how many trains can use a line at the same time.
Some other points to note about setting routes:
- It takes longer to set a route (called a lag) if one or more sets of points within it need to be changed; SimSig reproduces this faithfully.
- You may not be able to set a route until certain other conditions are met. For example, you may need to lower the barriers on a level crossing along it, or obtain permission from a shunter before setting a route into a yard.
- Although some sections of track are bidirectional, i.e., contain signals facing both ways, most are signalled only in one direction (unidirectional), so routes can only be set in that direction.
- Even in a bidirectional track, you are only permitted to set a route between signals facing the same direction.
- Only certain routes are programmed/built into the interlocking. As a result, do not be surprised if you find yourself unable to set a particular route that might seem perfectly logical to you. You will learn to anticipate and avoid these situations as your skill improves.
- Conversely, it is possible to get a train out of trouble by directing its driver to proceed under your control when you cannot set a route in the direction you wish. You may have to change or abandon the driver's timetable or even switch points (known as swinging them) to accomplish this. Needless to say, you should not employ these measures except as a last resort.
- After a train passes, the route must be released, making the track available to other trains. When this happens, the track and signal stem reverts to grey. In Royston and many other sims this takes place automatically and is known as Train-Operated Route Release (TORR ), the train triggering release as it moves along the route.
Where is Royston?
To those unfamiliar with the area, Royston lies approximately midway along a rail line north of London, whic runs southwest-northeast and connects Cambridge with the East Coast Main Line. It's rough geographical connection, and its relationship to other routes, can be seen on
this map.
Direction of Signalling
Since routes may only be set between signals facing the same direction, it follows that trains are not permitted to move in the opposite direction unless specifically by the signalman. Some lines are bi-directional, i.e. they have signals to allow moves in both directions. Royston platforms 1 and 2 are an example of this.
What do Up and Down mean?
The terms Up and Down are used to signify directions along main lines. Since most routes converge on London, Up means 'towards London' and Down 'away from London'. Like all railway conventions, there are no hard-and-fast rules, and you may find exceptions.
Get a Signal Map
To help you follow this tutorial, check that you have downloaded the signal map for Royston. You will find a link to one or more signal maps on Royston's Manual page . When playing a sim for the first time you will often see messages such as (Train xxx) Stopped at signal nnn, or in other sims, (Train xxx) Waiting at red signal nnn, where nnn is the number of the signal. The best policy is to download all documents linked to in the Reference Section, then toss out any you don't need only when you're experienced enough with that sim.
If drivers are brought to a stand at red signals (except when they are waiting for departure time at a station) they will call you to let you know, quoting the signal number they are stopped at. You may wish to use a signal number map to find the signal, or search for the train's description.
Starting the simulation
Assuming you have installed and opened the Royston simulation (v2.5), you will see the splash screen with a photo and some buttons at the bottom. Select New Game, then choose Perfect scenario, with Royston Summer 2003 set as the timetable. Click OK to close this screen and the next to start the sim. Then immediately press the P key to pause it!
Set Options first
Start by setting the various Options . Have an experiment, and find the combination that works best for you. When following this tutorial, it is advised that Windowed modeis checked, to make switching between this manual, the simulation and any other documentation easier. Also uncheck Show all windows on taskbar if you are running Windows 7 or Vista, to avoid this bug . Then close Options and restart the sim to allow the Windowed mode setting to take effect.
These options are carried across all simulations, so you won't have to set them up again should you download another.
This time you should see it running in its own window. Select another New Game with the same timetable (a term we will abbreviate to TT), but now, instead of the default 03:00, we will set the start time to 06:18. Start running the sim, then Pause it again if it is not already paused.
A quick look at the area
As well two other stations, Meldreth and Ashwell & Morden, the sim includes a loop and two sidings, one bearing the name Sherriff's. The difference between a loop and a siding is that a loop branches off the main line but always returns to it further down the track, whereas a siding doesn't return. In addition there are two level crossings of differing type, represented by broken orange bars, as well as some strange entities, one named LOS and the other, parallel to it, looking like a break in the track. Don't worry about them now; all will be revealed.
Compare this with your signal map. To help you, there is generally a pattern to signal numbers. For example, main signals on the Up line have mostly even numbers, while those on the Down line have mostly odd ones.
Before unpausing the sim, click File > Save As... and save your game under an appropriate title such as Royston 2003 Pfct 06_18.ssg. Now press P to continue playing.
Straight-through trains
We changed the start time to 06:18, one minute before the next train, 1T77, makes its appearance at the top LH corner of the screen, i.e., it enters from Baldock along the Down line. Baldock is hardly a major terminus; in fact it is only the next station beyond on the Up line. Likewise, Shepreth is an equally unremarkable station like Baldock, just off screen on the Down line.
I chose 1T77 to be our first train as it is a fast, straight-through train with no awkward reversing or shunting manoeuvres. Here it comes now.
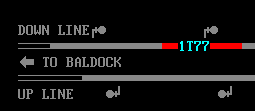
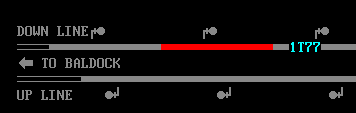
It looks rather weird. There's nothing looking like a train, only a sign saying "1T77" appearing to play leapfrog with the red stripe which tags along behind and sometimes catches up. Which one's the real train? Pause the sim again and read on.
The answers are as follows: the "1T77" sign is simply an assigned label that precedes the train, that you can change if you need to. The red stripe isn't the train at all, but simply displays its approximate position.
The grey signal colour means it's fully automatic or controlled by someone else; mostly you have no control over it.
Leave the sim paused for the time being and read on until we return to 1T77 later.
In SimSig you do more than simply set and clear signals and switch points; your job is to set routes for trains, where possible. You do this by determining which course you want to allow the train to take (its route), then clicking the signals along this route (more about this later) to set the route. By setting a route, you reserve that strip of track for that train until it has completed its journey along it.
If a train's timetable decrees it departs from Station A and terminates at Station B, you may find you can set a route for it only as far as some intermediate signal, possibly because there is another train beyond it, or the track beyond it has already been reserved for some other train. In SimSig, routes which have been set appear as a white stripe. The unset remainder of the track appears grey.
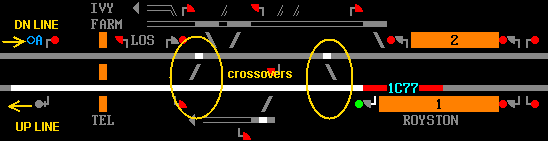
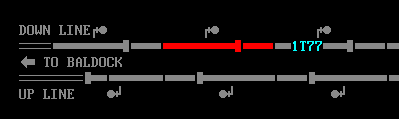
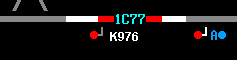
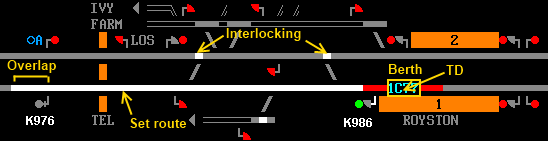 |
(In this picture we can see train 1C77 standing at Royston platform 1 on the Up line. A route has just been set for it from signal K986 to K976, as indicated by the white stripe. Notice, however, that the route extends somewhat beyond K976. Note the Overlap, explained above. Once the route has been set, interlocking (see below) affects the points on the Down line (arrowed and indicated by white rectangles) so that they are fixed "normal" (straight-through) and cannot be changed to "reverse" while the route on the Up line remains set. Note also that signal K986's berth (see below) contains the train's TD, 1C77). |
As stated above, routes are set from signal to signal. Under normal circumstances, you do not need to consider setting points manually (termed "swinging" them); all you need do is set a route through a series of signals that mark where you want the train to go, and the interlocking will look after the points for you. This acts as a safety feature prevents more than one route being set over a section of track at a given time.
If points need to be changed following you setting a route, the ends will flash for a few seconds before the points change position and the signal clears. The flashing represents the points changing position on the ground, which takes a few seconds.
 |
In the route setting example above where there is an Up Main (line) alongside a Down Main (line) with two crossovers between them, setting a route on the Up line that passes through the crossovers (see pic) immediately calls interlocking to prevent any route set on the Down line from straying into it (until it is released by a train passing over it, or the signalman cancels it). To put it another way, interlocking here prevents your setting one half of a crossover to "reverse" (branch or diverge) while the other half is set "normal" (straight-through). |
As a newcomer to SimSig you will probably find that, by preventing you from setting the route you want, interlocking can be one of the greatest frustrations you will encounter at first, as it may not be obvious why you are unable to set a particular route, until you notice the message Points locked normal/reverse by another route. However, if you study the error messages that appear, you will gradually understand how pervasive and powerful interlocking can be, and how to work around these limitations.
Returning to setting routes, if you need to set a route between signals A, B, C and D, you can do this in any order; for example, you could set A to B, C to D, then B to C. However, as a general principle you will find it easier and more logical to work in the direction of signalling, i.e., clear a route from A to B, then B to C, etc. It is also good practise to only set routes when required by trains.
You will notice that some signals have an 'A' button next to them. Clicking this button means that the route will be re-set every time a train passes, lightening your workload. Right-click the button, and the route will vanish for good next time a train passes.
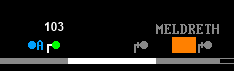 |
Signal 103 has its auto button engaged. Hint: To find out what a signal's ID (its number) is without resorting to the signal map, right-click the signal's coloured light dot (the colour it displays is termed its aspect) with the Option Right click cancels route unchecked as suggested above. This won't help you locate a signal given its number (you need the signal map for this), but it will confirm it. |
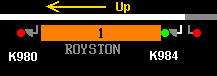 |
Note that the order of clicking signals to set a route must be in the direction of signalling. The only route that can be set between K984 and K980 is from K984 to K980, not the other way round. To set it you must first click K984, then K980. Clicking K980 first will not work. Obvious, I know, but it needs to be said. |
Blocks and Track Circuits (TCs)
The track up into sections known as blocks, each holding only one train at a time. Before a train can enter the next block, it must not contain any trains! How does the signalman know whether any given block contains a train? Its track circuits (TCs) tell him so. Briefly, each block of track contains one or more TCs in series, acting as sensors, so that if a train moves into the block, the first TC it contacts sends a signal to the control room, activating the display for that TC on the signalman's panel or screen. In SimSig that part of the track turns red. It's important to understand that the closest the signalman gets to knowing where a train is is seeing what track circuits it's occupying. While a train is crossing from one block to the next, or if it is a long train, more than one adjacent TC may be active, the total effect resembling a long red snake.
Displaying Track Circuits
Now press F3 (Options) again, check Show track circuit breaks and close Options.
What a difference, maybe not quite so pretty but a lot more informative. Every TC is displayed as a separate unit. Why not replay what you've just done with Track circuits enabled, by abandoning the game you've just commenced and starting a New Simulation and using Load Game to reload Royston 2003 Pfct 06_18.ssg.
This time as we watch 1T77 make its appearance, we notice two things:
1) The train (red stripe) steps from TC to TC;
2) Its ID (1T77), aka Train Description (TD) steps from signal to signal. Now we see why it is that they are not smoothly in step with each other.
You can see that the train is currently occupying two TCs. The one on the left resembles a T lying on its side. This signifies the end of the overlap TC for the grey (automatic) signal to the left of it. Don't worry about this just now. If you disable Show track circuit breaks, the breaks will be omitted.
Try playing SimSig with and without this feature enabled, and see which works for you. You may need to turn it on from time to time to solve a particular problem.
Berths, Train Describers, Train Descriptions and headcodes
In traditional wall panel layouts, when activation of a track circuit by a passing train lights a lamp on a large board on the wall. Unfortunately, this tells the signaller noting of the train's identity. To solve this problem, panels have 4-character displays built into them, adjacent to signals. These displays, termed berths, display the ID of a train approaching that signal. The term used by SimSig and most signalmen for a train's ID is Train Description (abbreviated to TD), though the terms Train Indicator and Train Reporting Number are also used.
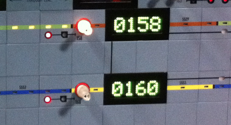 |
Detail of Cambridge panel showing two occupied berths adjacent to their respective signal lights. (Thanks Firefly for original pic) |
As a train progresses from signal to signal, the train describer ensures that its TD is passed from berth to berth.
Just like a berth at a wharf accommodating one ship, each berth holds the TD of one train. From then on, as electronic displays progressed, berths became labels on a computer screen which identify each train and follow them around. If a train with a particular TD terminates at a station to become a train with a different TT, its TD must change to suit. The obsolete term headcode is often substituted for Train Description, but is really a throwback to the days when the number was physically displayed at the head of a train (Wikipedia ).
Train Describers consist of 4 characters, consisting of: a single-digit number, indicating the class (type) of train; a letter, indicating the destination area; and a two-digit number, identifying the individual train or its route. See here for more details.
One of the main differences between wall panels and your screen panel view (as seen in SimSig's View window and in real-life IECC/MCS/Westcad panels*) is that on your screen, a berth that happens to be unoccupied does not show up as a black empty rectangle (as it might on a wall panel, being fixed there) - it simply does not appear at all! But it is there all right. To prove this, right-click any of the signals that are within your ability to insert a TD (termed Interposing), select Interpose Train Description and type in four or more alphanumeric (A-Z,0-9) characters (not case-sensitive, all will be converted to upper case). SimSig expects at least four, but as long as one or more are present, a berth will open near that signal and display what you typed.
*In panel displays by some other manufacturers such as Siemens, all train berths are displayed, whether empty or not.
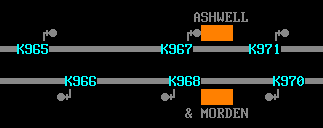 |
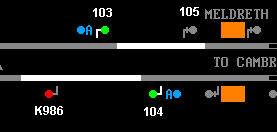
Just for the fun of it, we have opened a berth for each of these automatic signals (not only coloured grey, but distinguished by a short bar across each stem) containing its signal ID, to show that berths really do exist at each location, though may be unoccupied. Note that in K959-K963 and K960-K964, Interpose Train Description is disabled; it is not within your ability to interpose here, since these automatic signals, though displayed on your panel, are actually controlled by another signal box (Kings Cross, hence the K prefix). So don't be surprised if you find yourself unable to interpose at automatic signals located at the extreme ends of your area, where trains enter and leave. |
 |
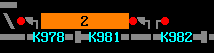 |
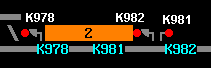
Remember what we said about berths being located behind their corresponding signals? This explains why the berths for K981 and K982 appear to be in the opposite order to the signal sequence along the Down track - the signals face each other! Also note that Platform 2 has two berths, so that two trains can be signalled into the platform while retaining their descriptions. |
Now we can understand more clearly how the Train's TD appears to "hop along" in front of the train, though never further ahead than the signal marking the end of the route set. Moreover, when we see a TD, we can do something else - left-click the TD to display its all-important timetable (the Show Timetable window).
SimSig is possibly the only signalling simulator where the player is able to vary the train describer's assignation of TDs to berths, just as in real life, by interposing new TDs. For example, a train that begins its daily life with a TD such as 5A81 (5 meaning it is an empty passenger train, termed "empty coaching stock" or ECS) travels to its first station to collect passengers, after which its TD might change to 1A81 (where 1 means "express passenger or mail"). When this change occurs it is your task to interpose the new TD into the same berth (or create a new one with this ID) by typing it in.
If you do need to interpose the next working TD for a train, the best place to do it is at the next signal ahead of the train, where the train describer will pick it up as it "steps along" through the berths. There is nothing to prevent you from typing "FRED" into a berth. However, as this is unlikely to be the TD of a train, clicking it will display Cannot find timetable for FRED(!), and a passing train might lose its own TD when it reaches it. Just like other features of SimSig, things can go wrong. You may accidentally type in a wrong TD; happily, SimSig ignores your wrong label as it maintains its own database, but you will be confused when the train does not behave according to the timetable you believe it should be obeying, and you will also receive an "incorrect route set" phone call from the driver should you set a route different from what he expects. To resolve this conflict, open the Train List by pressing F2, identify the train correctly from its location and interpose its correct TD. Remember that the TD you see is simply a label, there to help you identify each train, and does not affect its internal timetable unless you take the next step and force it to run to a different one.
Occasionally a train's TD may fail to be transferred to the next berth along its route, in which case the next berth will display

(four asterisks, not four "x"s), termed the non-described Train Indicator. In other words, the berth is not empty (contains a TD, otherwise it would not appear at all in SimSig) but the TD is unspecified. The term "undescribed" is sometimes used synonymously for non-described. Read onwards for forum posts about this.
 |
 |
You can duplicate this quite easily. Here in the Royston sim we have IC77 stopped at K976 (left pic). Before setting the next leg of its route to K974, we Cancel its TD. When it starts moving again, the next berth at K984 has no TD to transfer, but is required to display one, so it opts for four asterisks (right pic). In other sims, the berth will be completely hidden if there is no TD - it depends on the programming. |
Another term, rarely encountered, is a TD which is misdescribed, applied to the wrong TD being associated with a train, usually as a result of user error, and can be corrected by the method explained above.
Note that most shunt signals do not have a train describer berth, therefore the description will vanish when trains are routed towards these. Which leads us to...
Signal types
Oh yes, not all signal berths are capable of transferring a TD, in particular shunt signals. Briefly, in SimSig, as in life, there are basically two types of signals; those you can do something about or with (Controlled signals), and those you can't (Automatic signals). Controlled signals fall mainly into two groups, Main signals (aka Running signals) and Shunting signals (usually shortened to Shunt signals and also termed Ground signals).
Main signals
Main or running signals generally control main (i.e. non-siding) lines, while shunt signals control movement into and out of low speed areas such as loops and sidings. Main signals display whether or not the route ahead is clear, giving the driver confidence to continue at speed if he is "cleared" by the signal to do so (see below). They are usually placed high enough to ensure good visibility at a distance. Examples of main signals in Royston include K986 and K981. Routes should be set between main signals only wherever possible, and passenger trains must be routed using main signals unless a failure or other such unusual occurrence prevents it.
Signal aspects and indications
A signal's properties consist of its type, aspect and indication. We have already named several signal types so far; there are several other important ones, as we shall see. A signal's shape and colour often identifies its type; for example, automatic signals in SimSig have a short transverse bar across their stems, corresponding to the transverse black bar across their posts in real life. Strictly speaking, a signal's aspect is what the driver sees; its indication is its meaning to him. Thus an aspect can refer to the position of the arm of a semaphore signal, or the colour(s) of the light(s) displayed by a colour light signal.
SimSig uses two, three and four-colour aspect signalling according to the area being simulated and the types of signals used. Royston uses three-colour signalling (red, yellow, green). You can prove this by unchecking Options > Display > Panel signals. For example here, if four-colour aspect signalling (red, yellow, double yellow and green) was in use, K986 would be showing a double yellow, not green.

You will frequently find aspects described by their abbreviated indication, such as danger or stop aspect for red, caution aspect for yellow, preliminary caution aspect for double yellow, and clear for green, so as to leave no doubt as to their meanings. Since all except red allow a driver to proceed (at varying speeds), the other three are also referred to as proceed aspects.
Another pair of terms to get used to is restrictive and permissive aspects. The most restrictive a signal can be is to block a driver's further passage by displaying a stop or danger aspect. Anything less than that is a less restrictive (or a more permissive) aspect. So, green is less restrictive than double yellow, which is less restrictive than yellow, etc. Conversely, as a driver approaches a block which happens to contain another train, the more restrictive signal aspects become.
Panel signals vs track signals
When playing SimSig you have two options regarding your panel display. You may check the box Panel signals in Options > Display, or leave it unchecked. If you check it, controlled signals will display only red or green aspects (properly termed two-aspect signalling); automatic signals display only grey. If you would like to duplicate what your drivers see (particularly if you are learning about signals or want to reduce the number of yellows and double yellows that appear before your trains, slow them down and make you lose performance points), you should uncheck it.
Shunt signals
As we read earlier, Shunt signals control low speed movements across points, such as where a track connects to a low speed area such as a siding, loop or yard.
Shunt signals are often located on the ground (hence the alternative term ground signal) and modern ones resemble a triangle or quadrant, hence SimSig employs a similar icon to depict them. K246 and K247 are shunt signals. When standing alone, as these do, their icons are at the same level as main signals; but when they occur in conjunction with a main signal as in K982 and K984, they are displayed behind (below) the main signal (since in real life they are positioned lower) and because they are subsidiary to the main signal, are termed subsidiary shunt signals. These do not light up unless a route has been set from a main line into a siding, or when a train is cleared at low speed into a platform already occupied by another train, a procedure known as Calling-on (see later in this tutorial).
If there is a shunt signal between to main signals, setting the route between the main signals clears the shunt signal automatically. Passenger trains should not be manually routed to shunt signals.
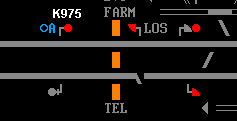
You may find shunt signals facing in the opposite direction from main signals; their purpose here is to allow trains to reverse at them. Where trains must travel a short distance in the reverse direction along a main line, there often has to be a limit beyond which a train is not permitted to proceed in reverse. Shunt signals marking such limits often indicated by the acronym LOS (Limit Of Shunt).
Shunt signals have a more limited range of aspects; red (On) or white (Off).
Unlike those main signals, most shunt signals do not have berths (although those at Royston do), and a train description will be lost if trains are routed via them. However, you should be able to anticipate this and know where to find its TD in advance, either from the Train List (F2) or by recording it on paper or on a SimSig sticky note (see later), and preferably not on an unoccupied berth! The message here is that you should always be on top of your sim in case the unexpected occurs. Note: Routing a train from a shunt signal to a main signal should not result in its TD going missing.
| Note also that some shunt signals may not have berths associated with them, as this is not a requirement. This might explain why one cannot interpose at K244 (it lacks a berth), though K253 at the other end of the Down Loop does have one. On the panel it is difficult to fit more than one berth into the Down Loop, so this one belongs to K253 - the most likely reason. Whether a train enters the Down Loop via K244 or K253, its TD can be interposed through K253. | 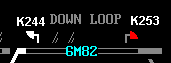 |
Automatic signals
Automatic signals are used away from points and other infrastructure to divide the line into sections. As a train passes one, the signal will go to red, and then change to yellow when the train has cleared the section ahead.
Main signals with automatic button
But just as in life, there are exceptions to every rule. For example, as we have seen, some running signals have an A button next to them, meaning you can set them to automatic clear. For example, when you start Royston, you should find that signals 103 and 104 show green without your clicking them; there are preset routes from 103 to 105 and 104 to K986.
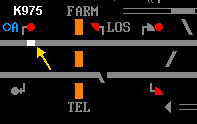
You will probably have noticed that K975 also has a blue A next to it (pic 1, below), though the accompanying blue button (which SimSig refers to as a roundel) is hollow instead of solid. Left-click the signal light (which also functions as a button) - the track just ahead will begin flashing (pic 2, below) - then left-click K977's light; the track between them will turn from grey to white (pic 3, below). Note the considerable overlap (explained a little later). You have set your first route! Now left-click the hollow blue button next to K975; it will turn solid, indicating that this route is permanently set (pic 4, below).
 1 |
 2 |
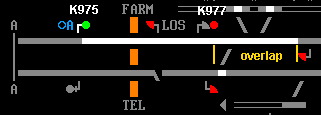 3 |
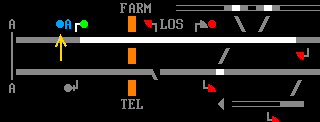 4 |
To disable the automatic button, right-click it. Now the route is still set (as in pic 2 above), but it is no longer automatic. Note: SimSig uses the following convention throughout its controls: Left-click to activate (enable), Right-click to deactivate (disable, cancel).
Another way to disable is to right-click K975 (short for right-clicking K975's signal light - clicking its stem or anywhere outside has no effect) and select Cancel route from the menu. The effect will be like that of pic 1 above; the route will be released and its automatic function disabled.
Note that to re-set such a route, clicking the blue button first won't work. A message is displayed stating "no route set from signal" - this is because all that clicking the blue button does is make the current route automatic- but the route still needs to be set first!
Automatic signals with Emergency button
Here's another exception to the distinction between controlled and automatic signals. Some automatic signals are capable of being set to red manually, for example K973 and K974 which oversee the Litlington level crossing (pic 1, below). If, for example, a slow moving vehicle requests permission to cross, you will need to set the signals to red to protect the vehicle. In this case, right-click the E (Emergency) button to set the signal (pic 2, below). In Pic 3, below, the Panel signals option is unchecked. The driver of 5R96 has had plenty of warning. Note also that, even though Panel signals is unchecked, the leftmost signal in pic 3, located just before Ashwell & Morden platform, is grey, not red. This confirms that it and all further signals Up (towards London) are fully controlled by Kings Cross and outside your area.
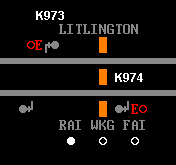 1 |
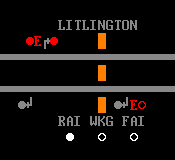 2 |
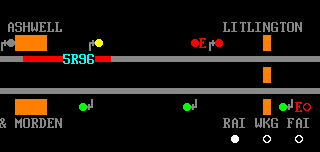 3 |
Other types of signals
You will encounter other types of signals such as Repeater signals, etc., in other sims but let's keep it simple for now.
For further information on signals see:
Last edited by GeoffM on 15/09/2016 at 03:00