Table of Contents
SimSig Victoria Central Panel 4Introduction
Wimbledon
Wimbledon West Junction
Receiving a Train
Cancelling an Approaching Train
Sending a Train
St. Helier
Mitcham Branch
Mitcham Junction
West Croydon
Sutton
Epsom Downs
ARS Subareas
SimSig Victoria Central Panel 4
Introduction
The final panel for Victoria Central comes in two main flavours: with and without the West Croydon to Wimbledon line. Two branches come in from Streatham South Junction (Panel 3 ), one branch to Wimbledon; the other to Mitcham Junction. In the 1990s there is a line that runs from Wimbledon to Mitcham Junction, giving two methods of access to Mitcham Junction. Later on the line became a tram line (Croydon Tramlink) so heavy rail services are never likely to run again on this route.
South of Mitcham Junction the line splits again with one branch going around to West Croydon (1990s era only; these days a tram line as above); the other line going towards Sutton. Sutton forms the junction between five lines - one from Mitcham Junction, as just mentioned; another from West Croydon, a third from Wimbledon, a dead-end branch to Epsom Downs, and finally the Portsmouth main line towards Epsom.
Wimbledon
Wimbledon has two layouts, one before the trams, the other after. Platform 9 remains a through platform throughout but platform 10 is a through platform in the 1990s era and a short, 4-car bay platform in the later eras.
Two sidings exist at the north end of the station. Siding B can be accessed by Victoria Central directly. However, siding A is also controlled by Wimbledon and needs a release in order to get a train in to or out of the siding. Left click on the green release request circle to get the release, which should be given within a minute by Wimbledon if they can grant it. Once granted, routes can be set normally but the release will automatically cancel after the passage of a train or the routes being cancelled.
Wimbledon West Junction
A complicated interface with Wimbledon signal box is located here. In reality there are six running tracks adjacent to each other here, four controlled by Wimbledon and two by Victoria Central. A pair of crossovers allow trains to cross from one box to the other. These points are dual controlled - both Victoria Central and Wimbledon can control them, but each needs the other to co-operate to release the points.
An unusual feature is that while each can request the points to be released for a train over the connections, the receiving signal box does not know what is coming until the release has been granted!
Both crossovers work in the same way: the instructions below are applicable to both.
Receiving a Train
When Wimbledon wants to send a train, the green circle labelled "Request FROM Wimbledon" will start to flash. Left click on the circle to release the points. Wimbledon can now set a route to a fictional signal mid-way across the points. This will cause the points to call to the reverse position, and route lights to illuminate to mid-way across the points, but Wimbledon's signals will not show a proceed aspect yet. At this point, the approaching train will be indicated in the Approach TD berth and, if the train is closely approaching, will show the first track as occupied.
Victoria now needs to complete the route. From the fictional signal mid-way across the points, set a route to the exit signal in the normal way. The route is now set all the way through and Wimbledon's signals may now clear.
However, note that signal VC851 requires an onward route set before the signals preceding it will show a proceed aspect. Thus trains can not be brought to a stand at signal VC851 from Wimbledon without a route set; a route must be set onward.
Cancelling an Approaching Train
Wimbledon may have wrong-routed a train. In this case they will cancel their route, whereupon the route lights will drop away to mid-way across the points - possibly after a time delay if there was a train closely approaching. Victoria Central needs to cancel the route from the fictional entry signal mid-way across the points.
Sending a Train
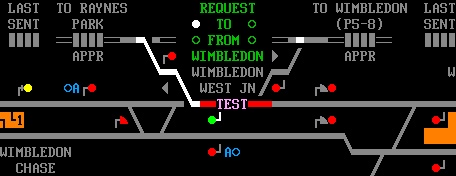
NB: It will be useful to turn on "Show locked points" in the F3 options (Options - Display ) when reading this part of the manual.
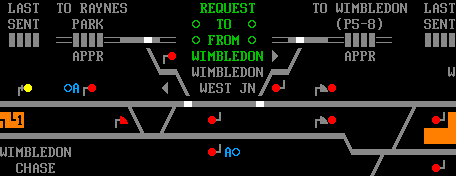 |
Before a route can be set towards Wimbledon, Victoria Central first needs to request a release on the points. These are shown locked in white here. |
 |
The points can be unlocked by left-clicking on the "Request TO Wimbledon" green circle (shown here for the direction towards Raynes Park). This will flash white until Wimbledon are willing and able to give the release. At this time the points will become unlocked, shown by the white locking on the points disappearing. |
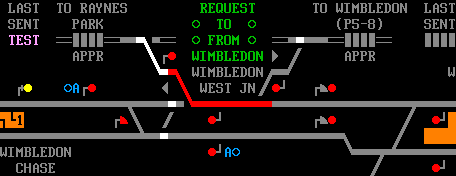
 |
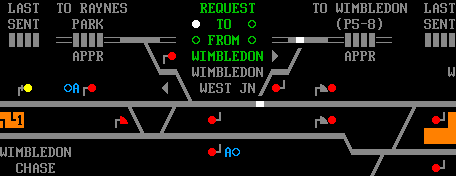
A route can now be set from the entry signal to the exit arrow located mid-way across the points. However, Victoria Central's signals will not show a proceed aspect yet as Wimbledon first need to complete their end of the route. |
 |
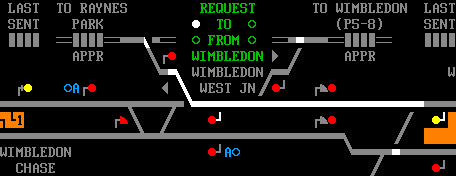
Wimbledon will now set their end of the route from the fictional signal mid-way across the points to a real exit signal. This causes a message to be sent back through the interlockings to indicate that Victoria Central can now clear its signals. Subject to approach control, Victoria Central's signals can now show a proceed aspect. Note that the route doesn't look complete - there is still a segment of grey at the end of the route. This is actually an approach track (see Receiving a Train) and does not illuminate for outbound trains. |
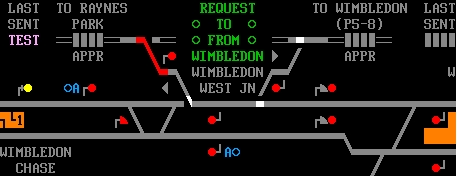
 |
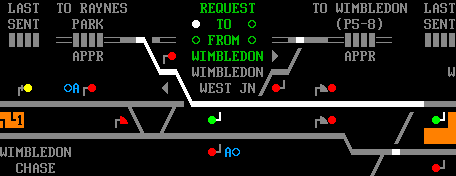
We can see the test train approaching. |
 |
When the train proceeds over the route, the release request will cancel automatically. |
 |
The train is now on Wimbledon's track circuits and we only see the last track circuit occupied. |
| |
Shortly afterwards the points will auto-normalise and become locked once again. |
If you have wrong-routed a train, or simply wish to withdraw the release request, you must cancel the route from the entry signal to the exit arrow. This is done in the usual way. Shortly afterwards, Wimbledon will notice that the release request has been withdrawn and they will then cancel their end of the route. The points will auto-normalise and become locked once again.
St. Helier
A ground frame exists at St. Helier allowing trains to proceed over the points and then reverse back over and cross to the opposite line. Standard ground frame controls apply here.
Mitcham Branch
(1990s era only)
There are two CCTV level crossings on this route which must be operated in the usual way before a train can cross.
Much of the line is single track. Direction of Flow indicators show which direction the track is locked in, and automatic signals will only show a proceed aspect if the correct direction is locked.
Mitcham Junction
During the 1990s and before, this station was indeed a junction with the branches from Wimbledon and West Croydon. However, in later eras the station was a junction by name only; the branches were removed and the track plain lined with automatic signals.
The following relates to 1990s era only:
From Mitcham station to Mitcham Junction station it is only possible to route into platform 2 at Mitcham Junction. However, in the opposite direction, it is possible to route trains from signal VC896 to VC892, and from VC898 to VC894 (and then to VC892).
At the other end of Mitcham Junction, it is possible to route onto the signal line from both platforms, and from the single line into both platforms.
Note that in both eras, the Portsmouth line is subject to a permanent speed restriction at both ends of the station as this was not originally the "straight" route. Have a look at this map and you can see the Portsmouth lines coming in from the top, curving around to their left through the station, then curving right again to disappear off the bottom of the map.
West Croydon
(1990s era only)
West Croydon has a bay platform for the use of trains from Mitcham Junction and is controlled by Victoria Central. The rest of the station is actually controlled by Three Bridges signal box (Croydon SimSig simulation) but they do not need to be involved to use the bay platform.
However, there is also a connection to the Three Bridges controlled tracks. In each direction, permission is required from the other signal box. For Victoria Central (you) to send a train to Three Bridges requires you to left click on the green slot request. Once granted, set route to the exit arrow.
If Three Bridges want to send a train to you, the train description will appear in platform 1 at West Croydon. You set a virtual route from signal T949 to VC875 which in reality simply gives a release to Three Bridges. Three Bridges can now set the route and the train will eventually proceed over the route.
Sutton
Numerous trains terminate and originate here throughout the day. Platforms 2 and 4 have TRTS indicators in the Up direction for this, however, the other platforms and directions do not. You can assume that the train will be ready by departure time unless you get a phone call to tell you otherwise.
Note that trains to/from Wimbledon change line direction approaching here, as the line forms a return loop. Trains coming towards Sutton from St. Helier encounter a steep uphill 1 in 44 gradient so it may be prudent to try to prevent heavy trains stopping at VC940 if possible.
In the opposite direction there is, of course, a steep downhill gradient. Trains approaching signal VC860 at red will do so with extreme caution which might block the junction at Sutton until the train is clear of it. This section of line is known as the "Wall of Death" due to accidents in the past, the gradient, and the high retaining wall between the Up Portsmouth and Up St. Helier lines. See this map for an overhead view or this view for a look from Sutton down the gradient. Other views can be seen here and here
Epsom Downs
This is a single track platform at the end of a single line. As a call-on route is possible into Epsom Downs station, it is possible to send two trains down the branch at the same time - be careful not to, unless they are scheduled to join! A "call-on available" indicator will light and a message will appear (with sound if enabled for "sim sound #1") once the second train is clear of Banstead station. The signal will show a calling-on aspect after the approach track has been occupied for 80 seconds as the track section is nearly three quarters of a mile long.
ARS Subareas
| Identity | Description |
|---|---|
| WMBLDON | Wimbledon |
| MORDEN | Morden branch (1990s era only) |
| MITCHAM | Mitcham Junction |
| WADDON | Waddon branch |
| SUTTON | Sutton and Epsom Downs |
| Previous | Contents | Next |
|---|
Last edited by Jan on 29/05/2018 at 17:51