Table of Contents
Timetable Editor - New train timetableTrain Details
Train Characteristics
Location List
Timetable Trip Editor
Misc
Shunt Options
Auto-Generate train descriptions
Timetable Editor - New train timetable
The TT Editor consists of three tabs:
Train Details
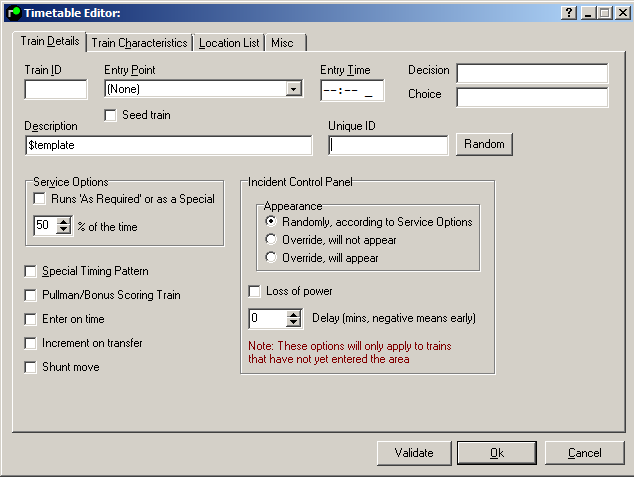
Train ID
The train's headcode, as displayed on the panel. In theory, this is unique, however in real life the descriptions can be repeated throughout the day. Previously, it was necessary to suffix the trains (e.g. 1A00-1 and 1A00-2), however it is now possible to specify a unique ID- see below. Where suffixes are specified, only the first 4 characters of the ID are displayed in signal berths. Headcodes and unique IDs for passenger and ECS trains in the current timetable can be found for free from Real Time Trains . For further explanation of Train IDs, see the Train Describer page.
Unique ID
A unique ID belonging to the train. This allows multiple trains to use the same headcode throughout the day, without the simulation confusing them. For example, two trains can have a Train ID 1L55, however as long as they have separate Unique IDs (and these IDs are used in activities and rules) the simulation can differentiate them correctly and any activities will function correctly. When a unique ID is specified in an activity or rule, it must be prefixed by a $ symbol. Unique IDs are only displayed when writing timetables- when playing the timetable, only Train IDs will be shown. For example, if a train has a next working with Train ID 1F34 and Unique ID A12356, the activity would be written as N: $A123456 in the timetable editor, however only 1F34 will be displayed when playing. Internally, the simulation uses the Unique ID to ensure the train forms the correct 1F34. Note that a train ID must also be specified, Unique IDs are optional.
Entry Point and time
The location the train enters the Simulation at. If the train originates at a station that is in the Simulation, leave the entry point as '(none)'. The entry time is obvious, although if the train enters at a half minute, add the letter H after the time, e.g. '13:45H'. Times may be specified to 1-second precision by ticking the box in Display options , although real-life timetables only go to half-minute precision.
Decision & Choice
Used in conjunction with Decisions , the name of the decision applying to the train should be specified, and then the name of the choice that causes it to run.
Seed train
This should be used to create trains at the start of the timetable, which are halfway through the control area at that time. Once ticked, select a signal number from the drop down box to the left. See also timetable seeding .
Description
Enter a text description here, e.g. 13:40 London- Holyhead. Alternatively, if "$template" is entered, the description will be generated from data in the 'misc tab. "$template" is the default entry when a new timetable is created.
Service Options
Runs as required or as special- Tick this box and and the train will appear x% of the times the TT is run. This can be used for freight trains that don't run every day, for example engineer's trains. See also Timetable Rules . Note that if the train runs 100% of the time, you don't have to change the '% run' box from the default 50%- just don't tick the box, and it will run 100% of the time.
Special Timing Pattern- Only used on ARS Simulations, this will cause the TT to be recognised as a Special Timing Pattern instead of a train. During the simulation, the Special Timing Pattern can be applied to another train so that ARS will route it according to the timing pattern rather than the train's original timetable. See the ARS page for more details.
Pullman/Bonus Scoring Train- Tick this box if you want the train to have a heavier weight in the Performance Analysis .
Enter On Time- Tick to force the train to enter on time.
Increment on Transfer- Superseded by UIDs, but still available for use.
Shunt Move- This is a schedule for a recurring shunt move between two locations- within a depot, for example. See the Shunt Moves page for more details.
Incident Control Panel
This can be used to force the train to enter, be delayed or have a loss of power. Note that these options will only apply to trains that have not entered the simulation, and that the settings only apply to the current session. When the simulation is started (or a saved session loaded) the 'Loss of power' and 'Delay' values will be randomly changed. The severity of delay and prevalence of power loss depends on the difficulty level set at the start of the simulation. Trains can be made to run early by entering a negative value in the delay field.
Train Characteristics
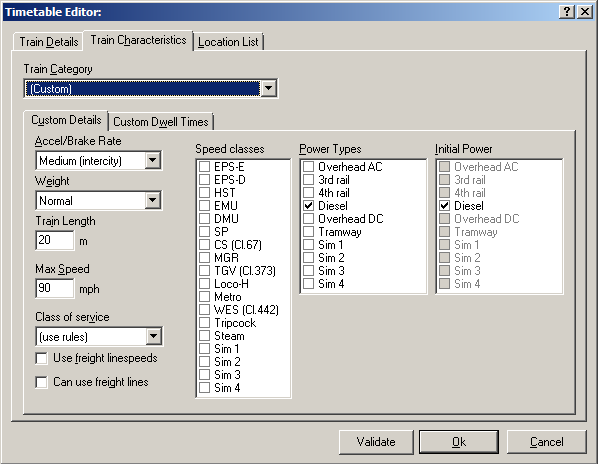
Train Category
Select from a drop-down menu all the types of train you have made in the Train Types tab. If this TT is for a type of train that will only appear once, select 'custom'.
Custom Category Details
See the Train Types page for details on how to fill this in.
Location List

The location list will become the train's schedule: the locations it will pass through during its journey and the times at which it should stop at, or pass through, each. This timetable is also displayed when you click on a train's description in its berth in the View window.
You should also be familiar with the code formats used to indicate whether a train stops at a particular timing point (waypoint) or passes straight through. See Timing Codes .
Add above- Add a location above the one currently highlighted.
Add below- Add a location below the one currently highlighted.
Move Up- Move the highlighted location up in the list.
Move Down- Move the highlighted location down in the list.
Edit- Edit the selected location.
Delete- Delete the selcted location.
Clear autoinsert- Some simulations will add locations, and calculate times for them, automatically. Click this to remove them from the list during editing (they will re-appear when the editor is closed).
Adjust times- Add x minutes to every time in the list (enter a negative number to make the times earlier). Add the letter H to the end of the number to adjust half-minutes. Times with the value 00:00 are ignored when adding minutes.
Set Next/Current location- If the timetable editor has been accessed via F2 , the current or next location will be shown in bold type. Highlight a location and click this button to change the location- this should only be used where the TT has become out of step with the train for whatever reason, and is not used in normal operation.
Clicking 'Validate Timetable' will check that the location sequence entered is valid. Depending on the Option specified, this can be done automatically when you click 'OK', otherwise you must do it manually. Non-Loader simulations will perform the check automatically when you click 'OK', and will force you to correct the timetable before it is saved.
Timetable Trip Editor
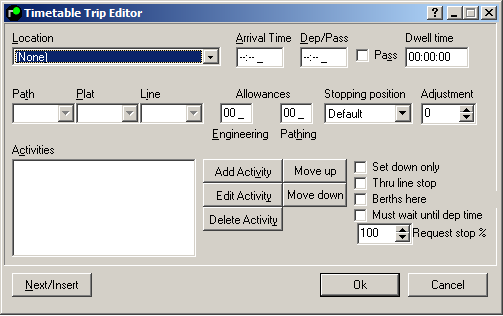
This will open if the Add (above/below) or Edit commands are clicked from within the Location List window, after a particular waypoint is selected.
Location and times
Select the location from the list, and enter the arrival (if relevant) and departue/pass time. A train will stop if a departure time is specified (and the 'passing time' box is not selected), however at larger stations it is helpful if and Arrival time is also specified. Half-minutes can be used, by inserting the letter H after the time (e.g. 13:45H). This will be displayed as a fraction outside the Trip Editor. Times may be specified to 1-second precision by ticking the box in Display options , although real-life timetables only specify half-minutes.
Passing Time- Select this if the train does not stop at this location. The time will be displayed as 'xx/xx'.
Set Down Only- Select this if the train stops only to set down passengers- if this is selcted, the train will not wait for departure time if running early. The time will be displayed as 'xxdxx'.
Thru Line stop- Select this if the train is booked to stop at a location that does NOT have a platform, e.g. a junction, or if the train is due to stop on a none-platform line at a station location. The time will be displayed as 'xxtxx'.
Berths here- Select if the train remains here for the rest of the timetable. This is usually used where empty trains are stabled in station platforms overnight. Ticking the box suppresses the 'Train has no onward warning' message in the Timetable Analyser .
Must wait until departure time- Forces the train to remain at the station until the booked departure time. Passenger trains will do this by default; this only needs to be ticked to hold a non-passenger train to time.
Request stop %- If the train stops on request at the location, enter the percentage chance of the train stopping. Default value is 100%, i.e. train will always stop.
Path, Platform and Line codes
Path- The track the train is on when arriving at the location, e.g. FL. See here for common abbreviations.
Plat- The platform the train is due to stop at. Note that this can also be a track at the location, e.g. 'TL' for 'Through Line', or a signal number where the location is used for reversing trains. See the abbreviations page for more details.
Line- The track the train should leave the location on (see Path).
On non-ARS simulations, Path is generally unused, and Line should only specified where a train changes between lines (eg Fast to Slow), or where the path isn't obvious from the next location. Platform detail should be specified where more than one platform can be used by the train. The exception to this is minor stations on four-track lines, where the correct platform can be determined from the Line field.
ARS simulations will require Path and Line fields to be filled at most, if not all, locations, and Platform fields filled at all locations where there is an option.
New Category
Trains can change some of their attributes during the course of their schedule at a location. For example, after a divide or join, without updating the description of the train it can show incorrect information to the user if a description like "4-car class 321" is part of the description. This field can therefore update what the user sees at and after this location.
Some of the attributes cannot be changed, such as length, since that is determined by the train itself. But the maximum speed can be specified, as can a number of other fields. Select the appropriate category from the drop-down list to have the train update at this location.
Another use case is where a work train travels at maximum train/line speed on the way to a work site but then has to travel at a lower speed while performing the work. Such an example is an MPV (multi purpose vehicle, typically a de-icer or Sandite unit). For this, it is suggested to have two train categories, MPV (travelling) and MPV (working), each with the appropriate attributes.
Allowances
If the time allowed for a train between this location and the previous is more than is necessary for this type of train, highlight it to the user by entering the number of minutes here. Note that any numbers entered here will NOT affect the times in the 'times' boxes. Engineering is used to counteract the effects of any TSRs on the route, while Pathing indicates that the train may be planned to wait at a junction for another train to pass, or follow a slower train.
Stopping Location
Adjust where the train stops (usually in a platform). 'Far end' and 'near end' are as the train arrives at the location. 'Adjustment' allows an offset in metres to be entered. If used with Far End, the train will stop that far short of the end of the platform, if used with Near End, the train will stop with its rear x metres away from the end of the platform.
Activities
Add Activity- Add an activity for the train at this location.
Edit Activity- Edit an activity for the train at this location.
Delete Activity- Delete an activity for the train at this location.
Move Up- Move the highlighted activity up the list, so that the train does it earlier relative to other activities.
Move Down- Move the highlighted activity down the list, so that the train does it later relative to other activities.
Please Note- if Unique IDs are specified instead of Train IDs, a $ symbol must prefix the Unique ID.
Dwell Time
Allows a minimum wait time to be specified at the location. Note that this time will be enforced on top of time taken for other activities (divides, joins, crew changes).
Types of Activity
Next Train- The train terminates at this location and forms a new service. Displayed as 'N:'
Divides (new rear)- Powered carriages are detached from the train at this location, and form a new service. Displayd as 'DR:'
Divided (new front)- Powered carriages are detached from the front of the train at this location, and form a new service. Displayed as 'DF:'.
Joins- The train joins another train at this location. Displayed as 'J:'
Platform Share- Indicates that the train is booked to share a platform with the train specified. This is required on ARS simulations for ARS to set a route into an occupied platform. Displayed as 'PS:'.
Drop carriages (at rear)- None-powered carriages are detached at the rear of the train. Displayed as 'DCR:'
Drop carriages (at front)- None-powered carriages are detached at the front of the train.Displayed as 'DCF:'
Detach engine (new rear)- The engine is detached at the rear of the train at this location, leaving the the train unpowered. Displayed as 'DER:'
Detach engine (new front)- The engine is detached at the front of the train at this location, leaving the the train unpowered. Displayed as 'DEF:'
Crew Change- The train crew change at this location. Note that activities below this one will not take place until the crew change has taken place. Also enter the time at which the crew is booked to arrive at the location in the appropriate box- obviously, this time should be early enough to allow both the crew change and any further activities to take place before the train's departure time. At higher difficulty levels, there is a chance of the crew being delayed- an earlier crew arrival time reduces the chance of this delay affecting the train.
There are then boxes for the identity of the train formed/detached/joined to be entered or picked from a list. Enter a time in the 'Duration' box to override the default time for the activity given by the train type; leave as 00:00:00 to use the 'train type' time.
Decisions can be used to make the activity conditional. Enter the name of the decision, and the name of the choice that will cause the activity to occur. Leave the two boxes blank if the activity should occur all the time.
Misc
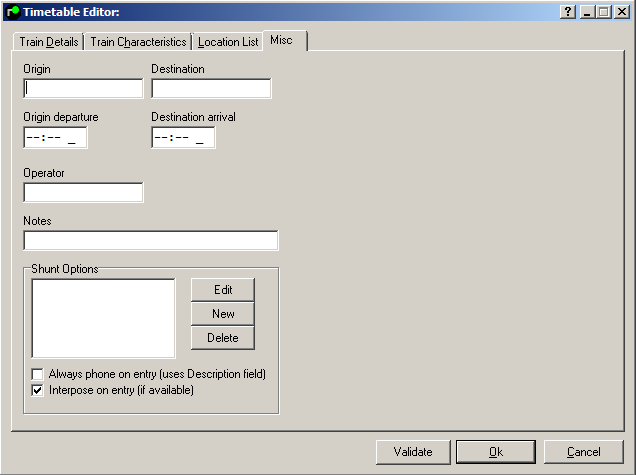
The 'Misc' tab allows entry of additional timetable information relevant to the train. Origin, Destination, Origin departure and Destination arrival are self-explanatory. 'Operator' may be the relevant two-letter ATOC code , or indeed any text.
Any text can be entered in the 'Notes' section, and may be used to highlight additional information about running the train to the operator. The text can be accessed when running the timetable via the show timetable window.
Note that is is not necessary to enter anything in these boxes for the simulation to operate correctly, if you wish.
Shunt Options
If the timetable is for a shunt move, details governing the time and frequency the train appears are entered here. See the Shunt Moves page for more details.
Auto-Generate train descriptions
Instead of manually entering a description in the train details tab, the data entered in the 'Misc' tab may be used to generate them automatically. The template for the descriptions can be edited in the General window, using the following identifiers:
| Identifier | Text |
|---|---|
| $originTime | Origin departure |
| $originName | Origin Name |
| $destName | Destination Name |
| $destTime | Destination arrival time |
| $operator | Operator |
| $stock | Stock the service is formed from- uses the name of the train type that forms the service |
Additional text may be included in the description for readbility- for example, adding a dash between two identifiers:
$originName-$destName
Will cause the dash to be displayed between the origin and departure times in the description.
To use the template in the description, simply leave the text in the 'description' box in the 'train details' tab as "$template".
It is not necessary to do this for all, or indeed any train; simply enter your own text in the description box.
| Back to Timetables Tab |
| Back to Timetable List |
|---|
Last edited by GeoffM on 03/12/2022 at 22:00