Scrolly Simulation
Window Types, Positioning and Resizing

Scrolly simulations have several windows that can be individually moved, resized or minimized to suit the screen facilities available.
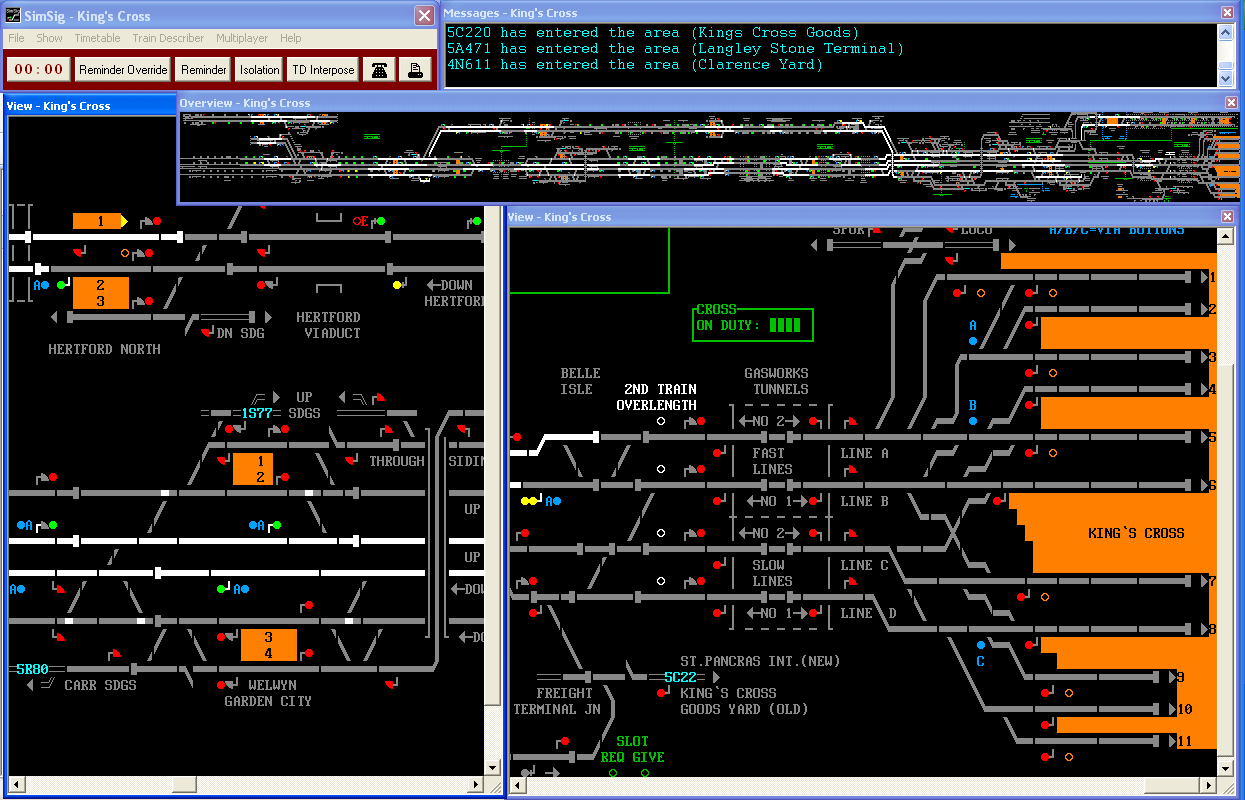
In the example above we see:
- The
Control window (top left) containing various controls (currently Paused);
- The
Messages window (top right) showing all messages received;
- The
Overview window (above centre), showing the entire area of the simulation;
- Two
View windows (bottom left and right), which are the main route setting panels*.
(*The default is one View window. Here the user has opened a second.)
Positioning and Resizing
Staying on Top
Any of these windows can be set to "Stay on top". To set this for the Control window, click Show > Stay on top. For any other window, right-clicking within it and select Stay on top. CAUTION: To avoid conflicts, do not do this to View windows if you have more than one view open (see below).
Opening a second View window
If you are playing a sim with a long layout it may help you to open one or more extra View windows, each focused on a different part of the layout. To do this, from the Control window click Show > New View, then resize the new View window to suit.
Resizing windows
Although the Control window cannot be resized, the Messages, Overview and View windows can be resized by dragging their top, bottom, sides or corners. Such a window can be restored to its full size by a right-clicking in it and selecting Maximise, but if you do this, note that the top edge of the View window will not be allowed to rise higher than (overlap) the bottom edge of the Control window, i.e., the maximum height of the View window is constrained by the location of the Control Window . Thus a good suggestion is to position the Control window somewhere along the top of your screen, to permit the maximum size of the View window beneath it.
Of course, if you try moving the Control window to the bottom of your screen and then maximizing the View window, SimSig will simply make this window of almost zero height so it can fit under the Control window and may even be offscreen, effectively causing your View window to vanish! So be careful. To recover from this, create a fresh View window using Show > New View, as explained above.
The New view option in the Show menu enables you to have more than one View window open concurrently. These can be arranged and sized to suit your preference, allowing you to monitor two or more separate areas at the same time. See Show...New View lets you fit more on a single screen for more about this.
If the Overview window is showing, left-clicking anywhere on it will scroll the currently active View window to the same location. This is the purpose of the Overview window.
You should now click the links above to read more about each of these windows.
| Corresponding view as seen in Paged displays |
| Back to Display Types page |
|---|
Last edited by GeoffM on 15/09/2016 at 03:01