![]() Page is locked
Page is locked
Table of Contents
EdinburghMillerhill
Millerhill Diversions
Newcraighall
Duty 2
Craigentinny
Abbeyhill Junction
Edinburgh Waverley
Signalling Notes
Operating Notes
Motorail and Parcel Sidings
Train Describer
OHLE
Duty 3
Princes Street Gardens
Haymarket
Haymarket West Junction
Edinburgh
Millerhill
Millerhill is a separate signal box controlling Millerhill yard and the Newcraighall area. A representation of the latter area is included in the sim, which is not totally accurate beyond Newcraighall.
Millerhill Diversions
Trains timetabled to go through Musselburgh may be diverted via Millerhill yard with no alteration required to the timetable, the line is fully electrified. If you divert a train via Millerhill it is best to phone Millerhill first as this will help avoid unnecessary delays to the train. Note that the diversion takes approximately 15-20 minutes.
Trains timetabled to travel through via the yard will leave the sim and will require to re-enter the sim on a separate timetable, there is no code provided to allow such trains to be diverted via Musselburgh without some manual fiddling of timetables.
Newcraighall
To route trains via the Up Millerhill (i.e. avoiding the platform) set a route directly from M28/M30 to Millerhill Yard.
The only route from M27 on the Up Millerhill is towards Brunstane.
Note that there are several ways to cause a stand-off between trains in this area; keep a close watch on ARS particularly where trains are running excessively early or late.
Duty 2
Craigentinny
The yard shunter will request a slot prior to allowing a train to approach EP852 on the East Depot Line.
You must request a slot from the shunter prior to setting a route into Sidings 3 and 4.
Signal EP624 is approach lit .
Abbeyhill Junction
Check the platform required by the train before setting a route through the tunnels, as only platforms 10 & 11 can be accessed from both lines.
A shunt route is available towards E422 for trains reversing behind E811.
Edinburgh Waverley
The boundary between Duties 2 and 3 is down the middle of the station; close co-operation is required between signallers in Multiplayer.
Signalling Notes
All lines within the station, including the non-platform lines, are permissive . Track circuit overrides are provided on the west-facing bays.
The majority of signals are last-wheel replacement .
Shunt routes are provided towards the first signal exiting the station at the Mound and Princes Street tunnels, and should be used for trains reversing within Mound or Carlton tunnels.
TRTS is provided on all platforms (but not the Parcel and Motorail lines).
Short trains in platform 17 should be signalled directly from E483 to E495/E497/E499; E485 will clear automatically. Setting the route from E483 to E485 will only clear the subsidiary on E483.
Signals protecting the mid-platform crossovers will need routes cancelling manually when trains stop straddling the crossovers.
Operating Notes
Platforms 1, 10, 11 and 19 are each long enough to accommodate the vast majority of trains. The combined length of the paltforms is generally only required by sleeper trains.
Trains timetabled to use platform 101 or 119 are booked to use the combined length of platforms 10/11 and 1/19 respectively.
Edinburgh (East) and Edinburgh (West) locations apply to the ‘through’ platforms 1, 10, 11 and 19 and associated loop lines. Platforms 20 and 21 will accept trains to these locations but can’t be set as booked platforms in the ‘plat’ field. These locations should only be used where the standard ‘Edinburgh’ can’t, which is generally when shunting between platforms. By default ARS will route trains via the loop line when accessing a ‘far-end’ platform and the East/West location can be added to
force a through platform approach. E.g. A train from Abbeyhill to P11 will by default be sent via the SLE line - if an approach via P10 is required then the ‘East’ location needs to be added with the required ‘plat’ a passing time.
Motorail and Parcel Sidings
The points for the Motorail and Parcel sidings (MR1&2, PC1&2) were controlled manually on the ground in real life. In the simulation, you will need to set the point to the appropriate line for a departing train before clearing E428/E450; the train within the selected siding will then be able to depart. Clearing the signals locks their respective point until the route is cancelled.
The sidings should not be used by passenger trains.
Train Describer
Each platform has four train describer berths. The berth nearest the buffers (the Rear berth) holds the description of the last train to enter the platform. The other 3 berths are the departure berths, which are named A, B and C. The 'A' berth is closest to the exit signal, and 'C' is the closest to the buffers.
ACI will fill the berths in reverse order; for example, in a simple 'Next' working, it will attempt to interpose in berth C. If C already holds a description, it will attempt berth B and so on. When a route is set from the platform starter, the description of the train closest to the exit signal will step to berth A prior to the train. If the route is subsequently cancelled before the train departs, the description will step back towards C.
The berth next to the signal on the panel will repeat the description in the first occupied berth, the order of preference being A, B, C- i.e. it shows the description closest to the signal. Interposing a description at the signal will initially interpose into berth A; the description will then step back towards C if the other berths are vacant.
Platform 7 is slightly different as there is only one berth displayed on the panel, and the rear berth (R) is shown separately. In order of preference, the berth on the main panel will repeat the state of berths A, B, C and R.
Platform 17 behaves identically, despite the presence of the mid-platform signal (see signalling notes above).
OHLE
Only a limited number of lines are electified at the west end of the station, as shown below:
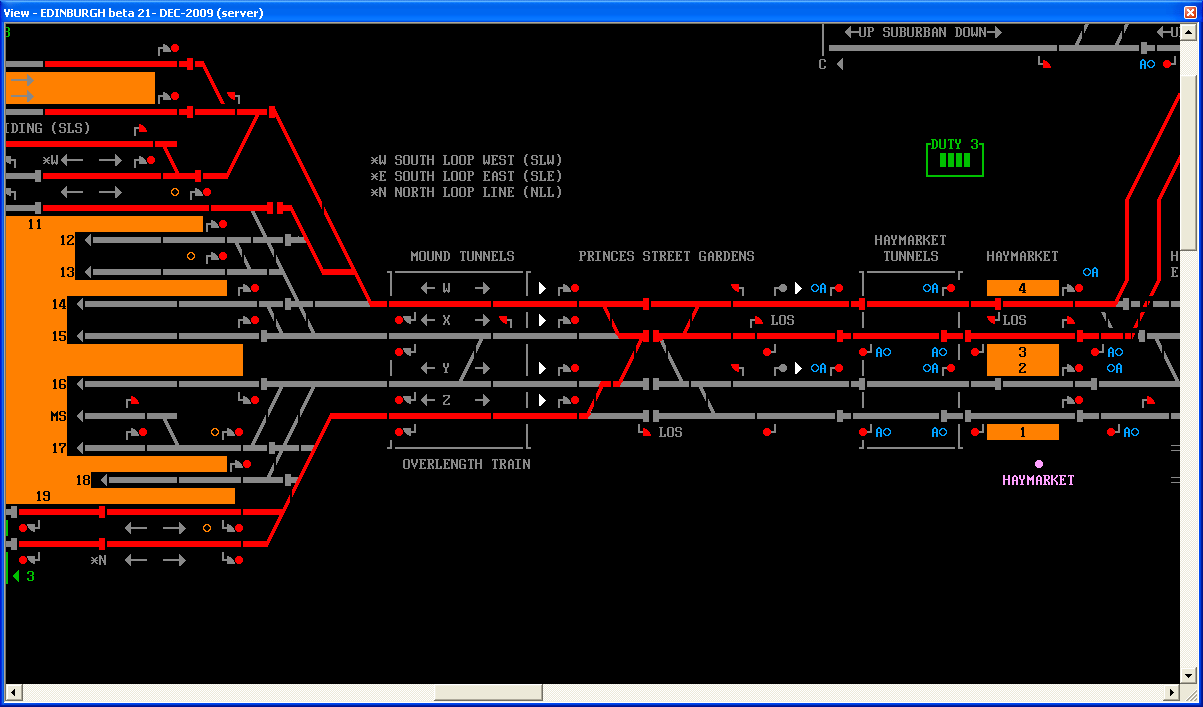
Platform 7, the Motorail and the Parcels sidings are electrified.
Duty 3
Princes Street Gardens
Take care routing trains towards Edinburgh, as each line has only a limited set of platforms accessible from it. It's particularly easy to be caught out by the fact that platform 13 can only be accessed from Line X, and Line Y has no access to any through platform.
The preferred route from E502 (Up South) to Line Y is via the first crossover; however, the second crossover can be selected by keying the first crossover Normal, or if a conflicting route from Line Z to the Down North is already set.
LOS E587 can only be accessed from E495. Shunt routes are available towards E503 and E505 for trains reversing at the Haymarket side of Princes St crossovers.
Trains to the Micalder line must cross to the Down South at Princes St.
Haymarket
Setting a route towards EH522 with platform 3 occupied will automatically select a warner route . Note that there is only approximately 40m available in rear of EH522 without fouling the pointwork at East Junction; this is particularly relevant for trains off the Micalder line. Effecticely, anything other than a single light engine brought to a stand at EH522 will foul the junction.
A slot must be requested a both ends of Haymarket depot prior to setting a route into the depot. Trains entering the depot will pass any train waiting to leave.
Haymarket West Junction
Via buttons are available at the West junction to allow moves from the Up E&G to the Up Gorgie and from the
Up Fife to the Up South to occur simultaneously, or moves from the Down Gorgie to Down E&G and from the Down North to Down Fife to occur simultaneously.
Last edited by Steamer on 11/02/2021 at 13:50