Table of Contents
Setting routesOverlap
Setting, clearing and cancelling
Repeater signals
Long routes
Cancelling routes
Where's the catch?
1C77 turns up
Setting routes
Consider the top two tracks with their grey signals in the Royston display to be largely information controlled by others but relayed to you to provide advance warning about trains approaching your area. Leaving aside what might happen at Litlington Level Crossing (LC), you have to wait until 1T77 approaches signal K975, just before Royston, the first controllable signal you can influence.
I suggested earlier that you disable Right click cancels route for now. If you enable this it will make it easier to cancel a route (simply right-click it), but the penalty is that the right-click context menu is bypassed, meaning you cannot use the second method to display the signal number. While you are learning a sim you are better off disabling this option to make it easy to confirm a signal's ID.
Continue the sim by pressing P again and left-click 1T77's berth. Immediately the Show Timetable window appears, indicating that 1T77 stops at all stations, particularly Royston Plat(form) 2 (often abbreviated to Royston P2 or Royston 2), which fortunately is also located on the Down line. We should now make haste to set a route for it, long before it reaches signal K975, so that there is need for it to stop unnecessarily.
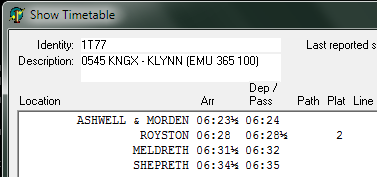
| Hint: There is no need to close the Show Timetable window for one train before opening that of another. Simply click the new train's TD in the View window and SimSig will overwrite the old one with the new. |
To recapitulate, routes along main lines are set FROM a main signal TO the next main signal or automatic signal, whichever comes first. Routes may also start from a shunt signal at a siding or finish at one. Additionally, trains may exit from the area by setting a route to an exit point (grey arrowhead pointing left or right) which may be at the end of a main line or in a siding.
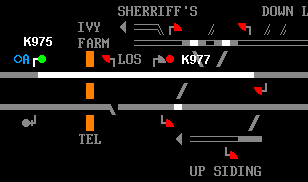
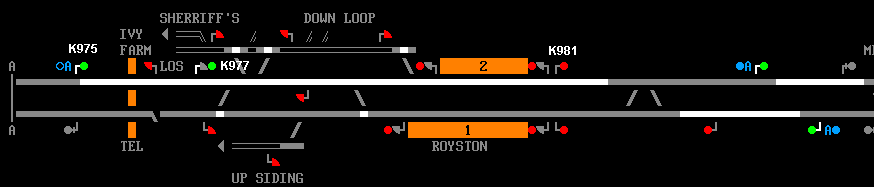
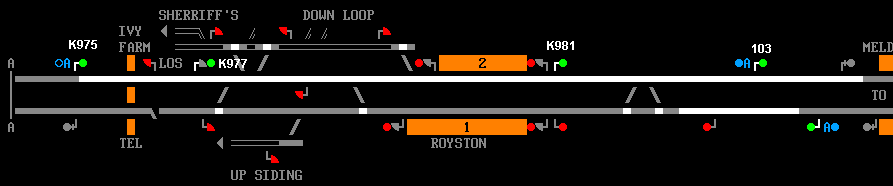
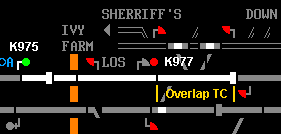
Examining which signals ahead of us are facing the train, we can see we need to set a route from K975 to K977 and then K981 to clear 1T77 into Royston. From there, we need to set an additional route from K981 to 103, our first controlled signal with automatic features, before completely automatic (grey) signals take 1T77 out of our hands. To set these routes, left-click on K975, then K977 (pic 1, below). Now left-click on K977, then K981 (pic 2, below). Finally, left-click on K91, then 103 pic 3, below). Done!
1
2
3
Note two things here. First, each step of setting the route interlocks the points of parallel lines to the same setting (straight-through, termed normal - the alternative is reverse). This applies to those points on the Up line and also on the Down loop. Second, the route set does not stop at the signal but overlaps for some distance beyond.
Overlap
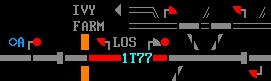
Overlap ensures that enough track is also cleared beyond the end of a set route for a train to stop safely if it overshoots the stop signal for any reason such as reduced adhesion in wet conditions, etc. If Show track circuit breaks is enabled, you will notice that the overlap beyond the signal is really a separate TC resembling a horizontal T, with the crossbar of the T at the far end of the overlap, like a stop. Beyond each signal is an overlap TC, long enough to enable the fastest train using this track to stop within it (pic 1, below). However, after a preset time long enough to ensure that a train activating the previous TC has come to a stop, the overlap TC, along with all preceding TCs, is released (pics 2 and 3, below).
 1 |
 2 |
 3 |
| One common reason for unexpectedly finding oneself unable to set a desired route is that the final overlap TC is unavailable (message: no overlap available), usually because it is already reserved by another route. Sometimes, you may be attempting to move the overlap so that it takes the train into a siding- this is not generally allowed, as a train overshooting the signal would probably be travelling too fast to negotiate the points into the siding. You may need to turn on TC display to identify which one is causing the problem and wait for it to be released, or set an alternative route. |
Setting, clearing and cancelling
Without any signals at all, trains would be free to roam and collide. Signals are placed to impose restrictions on movement, the basic principle behind implementing them being to restrict, rather than permit. Accordingly, the default aspect for any signal on a track where no route has been set is danger (red).
Clearing a route is generally used to mean setting it, i.e., clearing the controlled signals along it (obviously you can't do anything about any automatic signals that also happen to lie along it). As we have seen, this is indicated by that area of track between controlled signals turning from grey to white. But when a train clears a route it means the train has passed the last signal in the route and has reached its destination. When this occurs, the route is released automatically, provided TORR (Train Operated Route Release) is operating. (This happens automatically in most sims including Royston, although you have the option to disable it in some.) Controlled signals are reset to danger, the route set on your panel reverts from white to grey, and interlocking markers disappear from neighbouring points.
Note that you can also Cancel a route at any time, equivalent to releasing it manually. However, you are strongly advised not to do so in front of an approaching train, as approach locking (see later) will prevent the route from being cancelled until a safety interval has elapsed, and the unexpected adverse change of aspect (ACOA) from proceed to danger, experienced by the driver, will certainly prompt a telephone call.
Though not specifically stated, it should be obvious by now that you do not set routes in SimSig or in real life by directly changing signal aspects (colours); SimSig does this for you, along with setting points as required. All you need do is tell SimSig between which signals you want to set a route. You will know that you have successfully set a route between two signals when the first (nearer) one turns green. If it does not, you may have to clear some other obstacle first, such as lowering the barriers at a level crossing along that route to bar road traffic, or wait for an earlier train to pass so that the interlocks created by its route are lifted.
As noted earlier, routes may end at a main controlled or automatic signal, a shunt signal or an exit point (grey arrowhead) where the track terminates too. Consider an exit point to be a marker pointing to the next signal beyond it (offscreen), controlled by someone else. Wherever the train terminates, the final signal always indicates stop.
Repeater signals
Repeater signals are not encountered in the Royston sim but are worth mentioning here since routes cannot be set to them. They are used on lines controlled by 2-aspect signalling to show the state of the signal ahead- the main signal shows Red or Green, the Repeater Yellow or Green. The route should be set to the next signal. The most common type you will find in SimSig resembles an automatic signal, with the addition of the letter R. Here you can see the aspect indicated by the repeater when the following signal is On (pic 1, below) or Off (pic 2, below). In both pics Panel signals has been disabled.
 1 |
 2 |
Long routes
Up till now we have been setting routes from signal to signal. One cannot set a route between more than two main signals, unless the sim programmer has included long routes.
Each sim contains a database of allowed routes between signals, so if for example main signals A, B and C occur sequentially along a main line, SimSig should allow you to set a route between A and B, or B and C, but not between A and C; if you attempt this, you will see the error message No route between selected signals.
In our case, we are lucky. The Royston manual states "There are “long routes” right across the layout for through trains; clicking on 975 then C103, or 986 then 976, will set the route right through if it can."
Thus by clicking K975 and (C)103 in succession we can set a route between them, likewise between K986 and K976. Here is the latter before and after.


Try it. However, cancelling either long route isn't quite as simple. One has to cancel each segment by right-clicking the near signal for each part and selecting Cancel Route. It's only useful when setting the route, and then only if the train isn't required to stop at a platform not on that line, e.g., a Down train scheduled to stop at Platform 1!
Long routes are quite rare, and very few simulations feature them.
Cancelling routes
As we just saw, one way to cancel a route between two signals (let's name them near and distant, with the route starting from the near signal) is to right-click the near signal and select Cancel Route. This presumes that Options > Control > Right-click cancels route is unchecked, as recommended in the Options section at the beginning of this tutorial. However, if you check this option, cancelling a route is even easier - just right-click the near signal once. Furthermore, you cannot cancel an existing route by trying to set a new route from the same starting signal; you will receive a Cannot overset a different route message, meaning that you will have to cancel the old one before setting a new one.
As also mentioned, you must avoid cancelling a route in front of an approaching train (discussed in more detail under approach locking, later).
If you have only (left-)clicked the near signal and decide not to continue with it, simply right-click the same signal. The small flashing white track icon will disappear.
Where's the catch?
Wait. What's that funny looking object looking like a broken rail near the Ivy Farm level crossing present in the first pic (above) but not in the second? It represents a catch point, a device put there to derail any train running away in the wrong direction on the Up line. The catch point needs to be closed before trains can pass it travelling Up the line, which is why it does not appear in the second pic. Located here, it allows trains to pass Up but not Down.
1C77 turns up
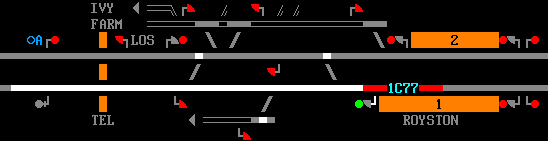
By this time, 1C77, another express passenger/mail train, should have entered from the Cambridge end at 06:23 on its way to Royston 1. You need only set a route from 104 to K976, including all running signals in between them that face Up, and your job is done, since all the ones beyond are fully automatic. Here's 1C77 waiting at Royston 1 for "right-away" (permission from the station to depart). Note that whatever overlap extended beyond K980 while the train was coming to a stop has now been released after a calculated time delay. Additionally, the flashing white platform light nearest K980 is the signalman's indication of the same fact and is called a TRTS (Train Ready To Start) signal, which is sent by the platform staff when the train is ready to leave.
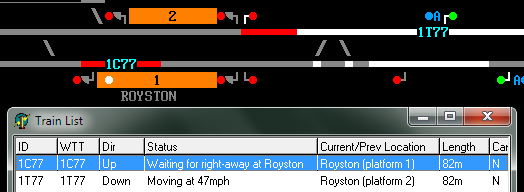
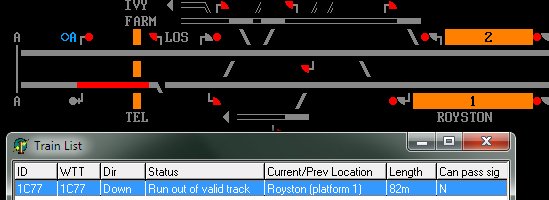
Pressing F2 brings up the Train List, a useful extra view as to what's going on. Beginners particularly should find it helpful, though do not rely on it too heavily as much of its displayed information, such as a train's current speed, is not available to signalmen in real life. As we have just witnessed, the signalman can infer from seeing the TRTS signal that a "right-away" is being or has just been given, but he does not see the information displayed on the Train List, only what is on his panel.
However, the Train List's Signalling Options menu serves another purpose, to simulating instructions from signalman to driver, as we see next.
| To see a catchpoint in action, why not try this? Once 1C77 passes the catch point and it reopens, right-click on its line on the Train List and select Signalling Options... > Reverse direction. 1C77's Direction on the Train List will change from Up to Down, it will begin accelerating, then decelerate as it approaches the catch point. Finally when it gets there you will see the alarming message "Run out of valid track". This does not mean it has actually derailed; SimSig does not permit such ungentlemanly events. It just means the sim software cannot find any more track in that direction for 1C77 to continue. So tell the driver to Reverse direction once again and watch 1C77 scuttle off towards Baldock. |
  |
See also:
Back to Royston - A Beginner's Guide
Last edited by GeoffM on 15/09/2016 at 03:00